2. Methods of examinations for patients with pathology of the oral mucosa. Pathological process in oral cavity. Primary and secondary oral lesions.
Always begin the evaluation of a patient with oral symptoms with an extraoral head and neck examination. In many instances, the clinical information gained is invaluable in determining the etiology and progression of the oral disease for which the patient is seeking treatment. For example, the major oral manifestation of the multiple hamartoma syndrome is the presence of multiple oral papillomas. Histopathologic examination of an oral biopsy specimen in such patients does not reveal any characteristic microscopic changes; however, recognition of the associated cutaneous tricholemmomas establishes the diagnosis. Altered pigmentation of the oral mucosa (eg, observed in adrenal cortical insufficiency, as a side effect of minocycline therapy) is mirrored by similar changes in the skin of the head and neck.
The presence of neck masses is not an uncommon finding, especially in patients with oral infections or advanced malignancies. The anterior cervical chain is most commonly involved, although other regional lymph nodes may be enlarged as well. Lymphadenopathy secondary to infection generally is both mobile and tender, while metastatic lymphadenopathy is asymptomatic and fixed to the underlying structures; however, a significant amount of variation exists in both subjective and objective findings (see the first image below). The next most common extraoral mass that may be found on palpation is a salivary gland neoplasm. Parotid neoplasms, in particular, are best detected by careful palpation of the preauricular skin (see the second image below). Extraoral palpation of the submandibular glands can often reveal enlargement and tenderness; however, bimanual palpation frequently is more effective.
The anterior cervical chain of lymph nodes is frequently involved in both inflammatory oral conditions and metastatic disease. Nodal changes are palpable all along the sternocleidomastoid muscle.
Parotid masses (especially in superficial lobe) are easily detected by digital palpation.
Patients frequently report temporomandibular joint pain and dysfunction. While the origin of such discomfort often is multifactorial and difficult to localize, the presence of crepitation, clicking, and popping of the temporomandibular joints can initially be detected by placing the tips of the little fingers in the external auditory canals and having the patient open and close the mouth and move the mandible laterally from side to side (see the picture below). Atypical facial pain may be due to causes other than temporomandibular joint dysfunction (eg, myofascial pain dysfunction syndrome, reflex sympathetic dystrophy, tic douloureux, related conditions). The definitive diagnosis of such conditions often is complicated and difficult and requires the combined expertise of physicians, dentists, and other health professionals (eg, physical therapists).
Crepitation, clicking, and popping of the temporomandibular joints are most easily detected by placing the tips of the little fingers in the external auditory canals and having the patient perform a series of excursive mandibular movements. A stethoscope placed anterior to the pinna of the ear can achieve the same result.
Examine the lips both visually and by palpation. The vermilion border should be smooth and pliable (see the picture below). Actinic damage to the lips (actinic cheilitis), especially the lower lip, manifests either as an atrophic change with associated erythema or a leukoplakia with marked thickening of the epithelium. Both of these changes can often be observed simultaneously in adjacent areas of the vermilion border.
The vermilion borders of the lips should be smooth and pliable. Ask female patients to remove any lipstick, which may obscure underlying surface changes.
Maceration and cracking of the corners of the mouth (angular cheilitis) was traditionally thought to be due to the following:
-Localized infection, primarily involving Candida albicans
-Nutritional deficiency, especially B vitamin complex
-Overclosure of the jaws due to loss of tooth structure (eg, bruxism, teeth, worn dentures)
While nutritional deficiencies and loss of vertical dimension of the jaws contribute to angular cheilitis, the vast majority of cases respond adequately to topical antifungal agents, often without any additional intervention.
As with any other portion of the physical examination, the examination of the oral cavity should be conducted in a uniform and consistent manner. For many individuals, the examination of the oral cavity is a clinical skill that is acquired only through repetition. Of greatest importance to the clinician in examining the oral cavity is adequate lighting. Dental offices are equipped for such examinations; however, medical practitioners who do not normally utilize fixed or head-mounted examination lights may be forced to rely on hand-held flashlights or a penlight, supplemented by the ambient room lighting.
Carefully evaluate the color of the oral mucous membranes. Oral mucosa has traditionally been described as being salmon-pink in color; however, great variation exists in the level of racial pigmentation and vascularity and keratinization. The amount of cutaneous pigmentation present generally is proportional to the amount of oral mucosal pigmentation; however, unanticipated changes in the color of the oral tissues may indicate systemic disease. Evert the lips and inspect the labial mucosa (see the image below).
The labial mucosa should be smooth and glistening. If the mucosa is wiped dry, pinpoint mucosal secretions from the minor salivary glands may become apparent.
In healthy individuals, the labial mucosa is smooth, soft, and well lubricated by the minor salivary glands. Anxiety regarding the examination may result in a transient xerostomia. In such cases, the mucosa becomes tacky to the touch. The minor salivary glands of the lower lip frequently are palpable. The lower lip is frequently subjected to injury that can cause trauma to the minor salivary gland ducts, resulting in the formation of a mucocele, a lesion most frequently found in this location.
Examination of the buccal mucosa is most easily accomplished by having the patient partially open the mouth, followed by stretching of the buccal mucosa with a mouth mirror or tongue blade. Persons of color frequently have a milky cast to the buccal mucosa that disappears when the cheek is stretched. This leukoedema is an anatomic variation that represents hydration of the buccal mucosal epithelium and requires no treatment (see the image below).

Leukoedema of the buccal mucosa is most commonly noted in persons of color. The milky-white appearance of the mucosa represents tissue hydration and disappears when the cheek is stretched.
Ectopic sebaceous glands (Fordyce granules) are present in the majority of patients and manifest as bilateral whitish-yellowish papules on the buccal mucosa. They may also be observed, albeit with less frequency, on labial mucosa. A horizontal ridge can often be found on the buccal mucosa at the level of the interdigitation of the teeth (ie, the linea alba), which represents a benign hyperkeratosis secondary to mild long-term irritation from the teeth cusps. The orifice of the parotid gland (ie, the Stensen duct) can be found as a small punctate soft tissue mass on the buccal mucosa adjacent to the maxillary 6-year (first permanent) molar teeth.
Fig. Linea alba on the buccal mucosa
The linea alba is a horizontal ridge (often hyperkeratinized) that is located bilaterally on the buccal mucosa at the level of the interdigitation of the teeth. The orifice of the Stensen duct is superior to the linea alba, adjacent to the maxillary 6-year molars. Gentle palpation of the parotid gland results in the expression of serous saliva from the duct. Saliva should be able to be expressed from the duct; however, extraoral massaging of the gland may be necessary. The saliva should be clear and watery, and the patient should not experience any discomfort with the procedure. As with the lips, the buccal mucosa should also be well lubricated with saliva. Minor salivary glands and Fordyce granules may impart a granular texture to the buccal mucosa. With the exception of recurrent intraoral human herpes virus type I lesions, which are limited to keratinized mucosa, vesiculo-erosive diseases most frequently involve the buccal mucosa.
The dorsal surface of the tongue is most easily visualized by having the patient protrude the tongue and attempt to touch the tip of the chin. Alternatively, the tip of the tongue can be grasped by the fingers and a 2 X 2-in gauze sponge. The dorsal surface of the tongue should be uniformly covered by numerous hairlike filiform papillae, shown below. Interspersed among the filiform papillae are dozens of mushroom-shaped fungiform papillae, each of which contains one or more taste buds, as shown below.
The dorsal surface of the tongue is an admixture of thin, keratinized, filiform papillae interspersed with pink mushroom-shaped fungiform papillae.
Fig. pink mushroom-shaped fungiform papillae
Each of the pink mushroom-shaped fungiform papillae is associated with several taste buds. The circumvallate papillae are at the junction of the anterior two thirds and posterior one third of the tongue. These structures normally are 8-12 iumber and are arranged in a V-shaped pattern. Like the fungiform papillae, the circumvallate papillae also contaiumerous taste buds. The filiform papillae occasionally become elongated (hairy tongue) and collect oral debris, which can lead to halitosis. The elongated papillae can also cause an uncomfortable palatal sensation that may lead to gagging. The presence of fissuring is of no clinical significance in the vast majority of cases.
Atrophy of the dorsal surface of the tongue can result from a variety of causes. Nutritional deficiencies have historically been associated with atrophy of the dorsal surface of the tongue; however, oral manifestations of mucocutaneous diseases often are the underlying cause. In addition to discomfort, patients often report altered taste sensations or complete loss of taste.
The lateral borders of the tongue can be examined by grasping the tip of the tongue with a gauze sponge, extending it, and rotating it laterally. The lateral borders of the tongue are not covered by a large number of papillae. The mucosa is more erythematous and, as one moves more posteriorly along the lateral border of the tongue, vertical fissuring becomes more prominent. Collections of mucosal-colored tissue with a bosselated surface can be found at the base of the tongue. This accessory lymphoid tissue (lingual tonsil) is a component of the Waldeyer ring and may become enlarged in the presence of infection or inflammation.
Fig. vertical corrugations of the tongue
The lateral border of the tongue occasionally has some associated vertical corrugations, but it may appear smooth and glistening. Lingual tonsils at the posterior-lateral base of the tongue represent the anterior extension of the Waldeyer ring. These tissues may become enlarged secondary to inflammation, infection, or neoplasia.
The ventral surface of the tongue is most easily visualized by having the patient touch the tip of the tongue to the roof of the mouth. The sublingual vasculature often is prominent, especially in older individuals. Fronds of tissue, the plica sublingualis, can frequently be observed extending from the ventral surface of the tongue, as shown below. The floor of the mouth, similar to the buccal mucosa, is salmon-pink in color. The ostia of the submandibular glands (ie, the Wharton ducts) are present as 2 midline papillae on either side of the lingual frenum, shown below.
The lingual frenum is the primary soft tissue attachment of the tongue to the floor of the mouth. Overattachment of the frenum may result in speech impediments (“tongue tied”).
Fig. the ostia of the Wharton ducts
The ostia of the Wharton ducts, which are located at the base of the lingual frenum, appear as 2 bilateral punctate structures. Mucous saliva can be expressed from the ducts with bimanual palpation of the submandibular glands.
Saliva frequently pools in the floor of the mouth during an oral examination. This pooled saliva is removed most easily with a gauze sponge. Subsequent bimanual palpation of the submandibular glands should result in the expression of saliva from Wharton ducts. This saliva generally is more viscous than that found in parotid glands because of the higher percentage of mucous saliva.
Both the ventral lateral surface of the tongue and the floor of the mouth are common sites for intraoral squamous cell carcinoma. For this reason, the index of suspicion for soft tissue lesions should be heightened, including otherwise innocuous appearing red or white lesions. Unless convincing history and compelling clinical evidence exists to the contrary, biopsies should always be obtained from chronic alterations and obvious masses to rule out the possibility of premalignancy or malignancy.
Direct visual inspection of the hard palate is accomplished most easily with the use of an intraoral mirror. The hard palate, similar to the attached gingiva, normally is less pink than other oral mucosal sites because of its increased keratinization, as in the first image below. These are the only 2 intraoral sites that are usually affected by recurrent intraoral herpes simplex virus infections. The anterior hard palate is covered by numerous fibrous ridges or rugae, as in the second image below.
The hard palate is keratinized and covered by a series of fibrous ridges or rugae. The mucosa overlays a number of minor salivary glands.
Fig. the incisive papillae
The incisive papillae are immediately posterior to the maxillary incisor teeth. They represent the inferior aspect of the nasopalatine duct and overlay a substantial neurovascular bundle that supplies the anterior hard palate. Minor salivary glands are abundant in the hard palate; because of this, a high incidence of minor salivary gland neoplasms, both benign and malignant, is found in this location. The incisive papillae are immediately posterior to the maxillary incisor teeth on the hard palate. This normal anatomic structure appears as a small firm nodule that is located directly below the ostia of the nasopalatal duct, from which a prominent neurovascular bundle exits the maxilla to supply the palatal mucosa.
In contrast to the hard palate, the soft palate is nonkeratinized and salmon-pink in color. It is easily visible on direct examination by depressing the posterior tongue with a tongue blade and instructing the patient to say “Ahhh.” Deviation of the soft palate to one side or the other may indicate a neurologic problem or an occult neoplasm. Once the posterior tongue has been depressed and the patient has elevated the soft palate, examining the oral pharynx is possible. This can occasionally be complicated in patients who have a hyperactive gag reflex; however, in such cases, the gag reflex can be suppressed through the use of topical anesthetics. The tonsillar pillars are visualized most easily by moving the tongue laterally with a tongue blade.
Fig. the soft palate
The soft palate is not usually keratinized and is more vascular than the hard palate, creating the darker red color. The tonsillar crypts are highly vascular and appear more erythematous than the surrounding tissues. Patients often have accumulations of desquamated epithelial cells, food, and other debris present in the tonsillar crypts, which can lead to a scratchy sensation in the throat and halitosis. Accessory lymphoid tissue on the posterior oral pharynx (adenoids) is normal and appears as pale irregular mucosal papules. These tissues may enlarge in the presence of inflammation or infection. Oral pharyngeal alterations are not uncommon, especially with oral viral infections (eg, herpangina; hand, foot, and mouth disease).
The gingivae are examined most easily with the mouth partially closed and the lips retracted with the fingers, a tongue blade, or plastic lip retractors. The attached gingiva (ie, gingiva adjacent to the crowns of the teeth) is keratinized and appears paler than other oral mucosa (see the first image below). This tissue usually is firm, stippled, and firmly attached to the underlying bone. The alveolar mucosa extends from the attached gingiva to the vestibule. In contrast to the attached gingivae, alveolar mucosa is not keratinized and is darker in color (see the second image below). The attached gingivae are frequently pigmented, the intensity of which is somewhat proportional to the presence of cutaneous pigmentation; however, alveolar mucosa is rarely pigmented, even in persons of color (see the third image below).
The attached gingiva adjacent to the teeth is keratinized and tightly bound to bone. Healthy noninflamed gingiva is stippled and resembles citrus rind (peau d’ orange).
Fig. alveolar mucosa
Alveolar mucosa extends from the mucogingival junction to cover the mucobuccal fold. It is not keratinized and often appears darker than the alveolar mucosa.
Fig. intraoral pigmentation of attached gingiva
Persons of color frequently have intraoral pigmentation, including the attached gingiva. The amount of pigmentation generally is proportional to the amount of cutaneous pigmentation. When present, racial pigmentation is bilateral. Alterations in the clinical appearance of the gingivae can be an indicator of both localized and systemic disease. The most common cause of erythema of the gingivae is poor dental hygiene. Retained dental plaque and calculus result in gingival inflammation and, if not removed, involvement of the underlying supportive structures of the teeth. The presence of retained dental plaque and calculus also serves as a nidus for a number of reactive gingival lesions (eg, pyogenic granuloma). The gingivae also frequently are the initial site of occurrence of mucocutaneous diseases (eg, lichen planus, cicatricial pemphigoid, pemphigus vulgaris). Finally, the gingiva is often affected in HIV infection and may be the first indicator of immunosuppression.
Examination of the teeth should be the final part of the oral examination. Any number of developmental defects of the teeth may be apparent. Partial anodontia is a common occurrence, especially involving the maxillary lateral incisors. Supernumerary teeth (eg, mesiodens) also are commonly noted. Missing teeth and supernumerary teeth are commonly found in a variety of inherited disorders (eg, Gardner syndrome, oral facial digital syndrome). Gross decay of the occlusal (biting) surfaces of the teeth usually appears as discolored cavitations and represents the sequelae of poor oral hygiene. Decay involving the interproximal (ie, tooth-to-tooth contact) surfaces may not be clinically apparent without the aid of dental radiographs. The decay at the gingival margins of the teeth adjacent to the attached gingiva may be the first manifestation of xerostomia. Root surface caries are also commonly observed in geriatric patients withgingivalrecession.
Laboratory Studies
Bacterial culturing is not routinely performed for oral lesions because of inherent problems with cross contamination. Viral culturing is performed with increasing frequency, especially in immunosuppressed patients with oral lesions of presumptive viral origin (see the image below). The Tzanck test, which looks for evidence of acantholysis in viral diseases (eg, herpes labialis) and autoimmune mucocutaneous diseases (eg, pemphigus vulgaris), is also occasionally used. Both tests unfortunately require that an intact blister be present, which often is not the case. Specific viral antigens can also be detected in biopsy specimens using various immunohistochemical techniques.Culturing of oral lesions is conducted most often when a viral etiology is being considered. Fungal cultures can also be taken; however, more cost-effective diagnostic procedures are available. Bacterial cultures are of limited value because of the difficulty in obtaining a pure specimen.
Fungal infections also are very common in the oral cavity. Potassium hydroxide digestion of a mucosal smear has classically been used to make that diagnosis; however, a dark-field or phase contrast microscope is necessary for in-office diagnosis. Smears can also be stained with one of several histochemical stains to reveal the presence of fungal organisms. These techniques often are more time consuming and expensive. Fungal culturing is of little value in most cases because of the slow growth rate of the organism. Rapid chair-side diagnosis is inexpensively achieved through the use of latex agglutination–based test kits developed for the diagnosis of vulvovaginal candidiasis (see the image below). These test kits are relatively inexpensive, highly accurate, and provide a diagnosis within 2 minutes.
Latex agglutination–based diagnostic tests for Candida albicans have been available for use in gynecology for several years. While not specifically marketed for e in the diagnosis of oral candidiasis, such tests have proven to be very accurate, easy to use, and cost effective.
Other Tests
A number of diagnostic tests are routinely used in conjunction with a comprehensive oral examination to provide supplemental informatioecessary to arrive at a definitive diagnosis and institute treatment. As with any diagnostic process, the tests and procedures employed should be based on their diagnostic value, relative risks (eg, morbidity), and expense. Earlier diagnosis generally corresponds to earlier treatment and a better prognosis for the patient.
An oral soft tissue biopsy is one of the most commonly used diagnostic tests. While the oral soft tissue biopsy is relatively simple, individuals with some experience in performing intraoral procedures usually obtain it. Adequate lighting and suction are essential. Antibiotic premedication is essential for patients at risk for infective endocarditis and patients with prosthetic joint replacement. A vasoconstrictor (epinephrine) containing local anesthetic is preferred to control surgical bleeding and retard diffusion of the anesthetic into the surrounding tissues; however, in some patients, a vasoconstrictor is contraindicated because of hypersensitivity or other complicating factors. Topical lidocaine is routinely applied to the area of needle insertion to minimize the discomfort associated with needle insertion (see the image below).
Local infiltration anesthesia for intraoral biopsies generally is easy to administer. Use of topical anesthesia prior to needle insertion has not been shown to provide any significant relief of actual discomfort; however, it does decrease patient anxiety regarding local anesthesia. The selection of the specific biopsy site and biopsy technique is determined on the basis of the presumptive diagnosis and location of the lesion. For example, mucocutaneous diseases require an incisional biopsy to determine the specific diagnosis and appropriate treatment. In such cases, an incisional mucosal punch biopsy (3-4 mm in diameter) is sufficient (see the image below). Space-occupying lesions (eg, mucocele on the floor of the mouth) require a scalpel excision (see the second image below).
Biopsy punches come in a variety of sizes and in both reusable and disposable forms. Disposable biopsy punches are lighter and more easily manipulated than their metal counterparts. Most incisional intraoral biopsies can be performed with a 3- or 4-mm punch without suturing. Larger punches can be used for small excisional biopsies but usually require suturing for hemostasis.
Fig. instruments for oral biopsies
A No. 15 Bard-Parker blade, atraumatic forceps, and suture material are used for many oral biopsies and other soft tissue procedures. Take care to avoid the use of nonresorbable suture material for submucosal closure.
Because of the vascularity of this particular anatomic site, perform scalpel incisions in an anterior-posterior direction to minimize severing neurovascular structures. Avoid inclusion of the marginal gingiva in gingival biopsies for esthetic reasons, especially in the anterior maxilla. Handle small biopsy specimens with atraumatic Adson forceps rather than mouse-toothed forceps, which can damage the integrity of small mucosal specimens. The small size of most oral biopsy specimens requires that the specimen be placed in the appropriate fixative immediately after removal from the mouth. Ten percent neutral buffered formalin is used for most routine biopsies.
Fig. fixsative solution
Tissue removed from the mouth must be placed in a fixative solution (except for the submission of material for frozen section in the hospital). For routine biopsies, 10% neutral buffered formalin is the fixative of choice. Consult the pathology laboratory for any anticipated special procedures to ensure that the tissue is handled properly.
The most recent development in oral biopsy technique is the oral mucosal brush biopsy, shown below. This technique uses a disposable brush to collect a transepithelial sampling of cells. The sample is screened by a neurally networked computer that is programmed to detect cytologic changes associated with premalignancy and squamous cell carcinoma. The specimen is reviewed by a pathologist for final diagnosis. This technique is ideal for determining the need for scalpel biopsy in benign-appearing oral mucosal leukoplakias.
The brush biopsy is an excellent procedure to screen benign-appearing oral mucosal leukoplakias to determine the need for subsequent scalpel biopsy. The procedure can be performed without anesthesia.
Primary and secondary lesions elements of the oral mucous membrane
The development of any mucous membrane disease characterized by appearance on the surface of original elements of lesion. Observed on the skin and mucous membrane rash consisting of individual elements according to their symptoms can be grouped into several groups:
1) change the color of oral mucosa;
2) change the surface of oral mucosa
3) limited fluid accumulation;
4) layers on the surface;
5) defects of oral mucosa.
Elements of damage is conventionally divided into primary as the result on an unchanged oral mucosa, and secondary as the result from transformation or damage to existing items.
The primary elements of rash include: 1) macula, 2) bundle (papules), 3) nodus, 4) tuberculum, 5) vesicle, 6) cyst, 7) blister, 8) bubble.
The secondary items considered: 1) erosion, 2) aphthae, 3) ulcer, 4) fracture, 5) scales, 7) crust, 8) scar, 9) lihenization.

Primary elements of damage.
1) spot (macula) – discoloration of mucous membrane in a limited area
Depending on the causes of spots the color is different. Spot never can be above the level of mucous membrane and does not change its appearance. There are vascular spots, pigmented and spots that appear from delay of coloring substances in mucous membrane. Vascular stains may be due to a temporary expansion of blood vessels and inflammation. Inflammatory spots have different shades of color, often red, sometimes bluish color. During pressing on these spots they disappear and after stop pressing they again appear.
Fig.pigmented spot on the lower lip
Erythema – unrestricted, without clear contours redness of mucous membrane.
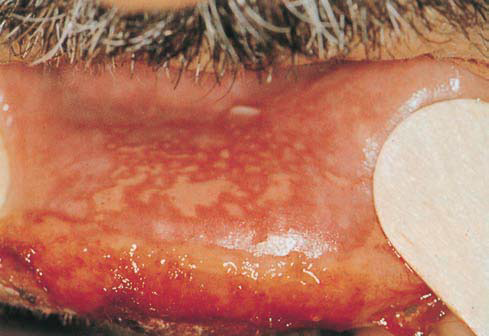
Fig.Erythema and erosions on the lower lip, caused by ionizing radiation
|
|
|
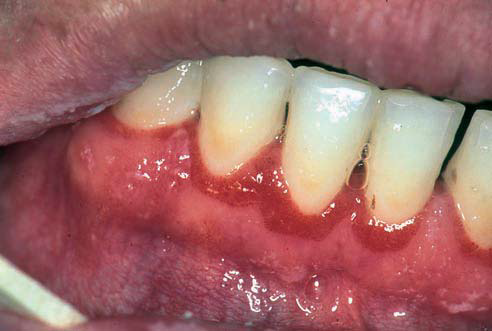
Fig. Linear gingival erythema, fiery red band along the margin of the gingiva |
Roseola – small round erythema with a diameter of 1.5-2 mm to 10, and special contours. Observed in infectious diseases (measles, scarlet fever, typhoid). Hemorrhage – spots are caused by violation of integrity of the vascular wall. Their size is different. Color of spots depends on the degree of decomposition of blood pigment and can be red, bluish-red, greenish, yellow, etc.. During pressing the bleaching of hemorrhage doesn’t occur. Sometimes, they disappear without a trace.
Petechiae – pin-point hemorrhages.
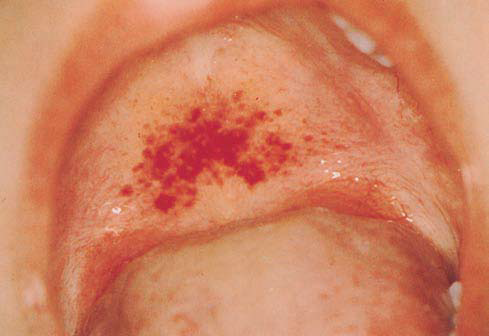
Fig. Infectious mononucleosis: petechiae on the palate
Ecchymoses – large hemorrhages round or oval.
Telangiectasia – spots that appear as a result of steady noninflammatory vasodilatation or neoplasm. They formed a thin winding vessels that can split together. During pressing telangiectasia stays a little pale.
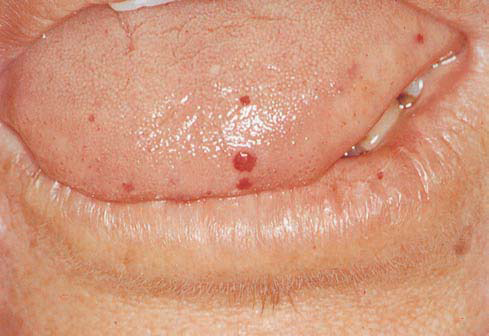
Fig. Hereditary hemorrhagic telangiectasia: multiple lesions on the tongue
Spots arising from the acumulation into mucouse membrane coloring substances of exogenous and endogenous origin. They can be congenital and acquired. Natural Born pigmentation called nevi. Acquired pigmentation have endocrine origin or are developing from infectious diseases.Exogenous pigmentation caused by the penetration of substances from the environment into mucouse membrane These substances are industrial dust, smoke, chemicals, including drugs and more. Pigmentation in the case of penetration into the body of heavy metals and their salts has a clearly defined form. Color it depends on the type of metal. The color of stains, caused by mercury is black, lead and bismuth – dark gray, zinc – gray, bronze – green, silver – black or slate.
2) papule or nodule (papula) – solid element that stands above the mucous membrane. Infiltrate papules located in the papillary layer of its own plate .Form papules may be pointed, round. Their diameter is 3-4 mm. In case of merger papules form plaques. After treatment papule doesn’t leave trace. Ex: Erythema multiform, lupus erythematosis, sarcoidosis.
3) knot (nodus) – limited to large size compression (from hazelnut to chicken eggs), which reaches submucosal base .Formation of knots may be due to inflammation, benign and malignant tumor growth and deposition of calcium and cholesterol in the thick tissue.
4) tubercle (tuberculum) – infiltrative solid rounded element,the size of a pea to that above the level of mucous membrane . Infiltrate captures all layers of mucous membrane. Feature protuberance, which at first is similar to the nodule, is that the central part, and sometimes the whole element caekrotizes. This leads to the formation of ulcers, that can scars or resolves without prejudice intact epithelium, with formation of scar atrophy. They are the primary elements in lupus, hilly syphilis, leprosy.
5) bubble (vesiculum) – cavernous element that has size of millet seeds to nuts, filled with fluid. It formes in spikes layer of epithelium, often a serous, rarely hemorrhagic content of rash vesicles can be observed as unchanged, and hyperemic and swollen on the basis. Because the bubble wall formed by a thin layer of epithelium, that easily breaks and forms erosion at the edeges of which remain scraps bubble. After treatment bubble does not leave a trace.
Fig. herpes labialis
6) blister (bulla) – cavernous element, elevated blisters seen on the surface of mucosa, which contain clear fluid and are less than 1 cm in diameter.
Fluid of blister may be serous or hemorrhagic. The cover membrane is thick, so it exists on mucous membrane longer than interepitelian blister, which easily forms erosion, appearing on the site of blister. Heals without scar formation. Ex: Atopic Dermatitis, Chicken Pox, Herpes Zoster, Herpes Simplex
7) boil (pustula) – limited accumulation of purulent exudate. Boils are primary and secondary. Primary boils have developed an unchanged mucous membrane and immediately filled with purulent content of whitish-yellowish color. Secondary pustules arise from bubbles and blisters formation of boils. Pustules may be superficial and deep.
8) cyst (cystis) – cavernous lesion, which has a wall and contents. Cysts are of epithelial origin and retentional. The content of the cyst – serous, sero-purulent or bloody. Retentional cysts are placed on the lips, palate and buccal mucosa, filled with transparent content, which when infection is purulent.
Secondary elements of damage.
1) scales (squama) – plate, which consists of desqumosh keratinized epithelial cells. Flakes resulting from hyper-and parakeratosis. usually on the ground back of patches, papules, humps come in many colors and sizes. May be primary at soft leukoplakia, exfoliative heilitis, ichthyosis. To diagnose lesions with the formation of scales need to know their location, thickness, color, size, texture.
Fig. exfoliative heilitts
2) erosion (erosio) – defect in the surface layer of the epithelium. Because the lesion is shallow, after his healing is not a trace. Erosion occurs from blister rupture, destruction papules, traumatic injuries.
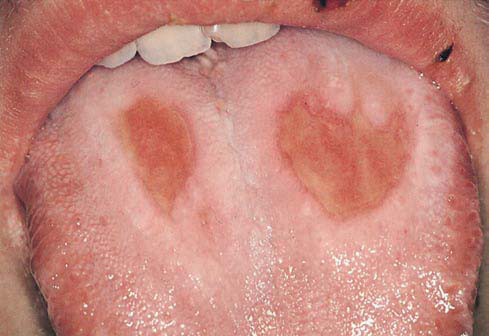
Fig. erosions on the dorsum of the tongue, caused by very hot food
When erosion breaks, the blister erosion repeats its path. In the case of mergers created large erosions erosive surface with different contours. On the mucous membrane surface erosion may occur without blister, such as erosive papules in syphilis, erosio-ulcer form a scab red flap and lupus erythematosus. Formation of erosion resulting from trauma easily inflamed mucous membrane.
3) aphthae (aphta) – superficial epithelial defect round or oval, 0.3-0.5 mm in diameter, located on the inflamed mucous membrane. Aphthae covered with fibrinous effusion, which provides an element lesions of white or yellow tint. On the periphery aphthae surrounded by a bright red rim.
Fig. recurrent aphthous stomatitis
4) ulcer (ulcus) – defect within the connective tissue layer. Healing occurs with the formation of a deep scar. As formation of ulcers characteristic of a number of pathological processes, to facilitate differential diagnosis ascertain the nature of lesions’ depth, the form of ulcers, a condition its edges and surrounding tissue, etc.The edges of ulcers are hanging over the bottom, and the sheer, plate-shaped. They and the bottom of the ulcer can be soft and hard. Also. at the bottom of ulcers often observed purulent plaque necrotic mass, granulation growth. It can easily bleed when touched. Sometimes ulcers extend into the underlying tissues (muscle, bone) and even destroy them.
Fig. traumatic ulcers, hard palate
5) crack (rhagas) – linear strain mucous membrane or red fringe lips, which occurs when their excessive dryness or loss of elasticity and inflammatory infiltration. Most cracks are observed in areas of natural folds or in areas of trauma and stretching. There are superficial and deep cracks. Surface crack is localized within the epithelium heals without a scar. Deep crack extends to the connective tissue of their own plate, heal with scar formation.
6) crust (crusta) formed as result of drying fluid that flows out after pulling blister, blisters, pustules.Cruct is a mixture of coagulated tissue fluid and blood plasma and blood cells that have collapsed, and epithelial cells. Crusts color depends on the nature of fluid. In the case normal serous fluid formed grayish-or honey-yellow crusts, purulent – dirty-gray or greenish- yellow, hemorrhagic – bleeding brown. In the forcible removal of crust exposed erosive or ulcerative surface, and after natural falling down – area regeneration and scar or atrophy scar.
7) scar (cicatrix) – area of connective tissue that replaces defective mucous membrane, arising if its damaged or pathological process. The scar consists mainly of collagen fibers coated with a thin layer of epithelium in which no epithelial performances. The shape and depth of the scars are different.There are hypertrophic and atrophic scars. Hypertrophic (keloid) scars occur after trauma and surgery. They have a linear form dense, often limit the mobility of mucous membrane. Atrophic scars formed after healing elements of tuberculosis, syphilis, lupus erythematosus.
Universal Precautions for Health and Safety
Universal precautions for health and safety are measures that are designed to protect against the possible transmission of blood borne pathogens from patients to medical personnel, health care workers and medical and health support personnel.
Universal Precautions are Followed for Every Patient
Under the guidelines published by the Center for Disease Control, known as the CDC, the same universal precaution procedures are followed for all patients as each one is considered a possible carrier of an infection. The precaution techniques are used minimize the possibility of an infectious condition being transmitted to a health care worker. Possible infections include HIV and Hepatitis B, as well as other pathogens.
All medical personnel in hospitals, nursing homes and medical laboratories follow the techniques and safety measures that make up the universal precaution guidelines. They are also in place in certain situations involving childcare settings, schools and industrial settings.
A Brief History of Universal Procedures
These precautionary techniques of universal precautions are the result of the outbreak of AIDS, or acquired immunodeficiency syndrome, that took place in the 1980s. In the summer of 1987, following the news that three workers from a clinical laboratory were infected with HIV, the universal precautions, or UP, were put into effect. This was followed in 1991 by the publication of universal standards of health and safety by the Occupational Safety and Heath Administration, or OSHA.
The regulations and procedures are updated as often as the CDC and OSHA feel necessary to further safeguard health field and laboratory workers. In 1996, the Center for Disease Control updated the guidelines to include standard precautions, mostly for use in hospitals, to include isolation precautions.
What bodily fluids are included under Universal Precaution Measures?
Universal precaution procedures include the following bodily fluids and tissues from the included areas.
|
Blood |
|
Vaginal secretions |
|
Semen |
|
Amniotic fluid |
|
Synovial fluid |
|
Pericardial fluid |
|
Cerebrospinal fluid |
|
Plural fluid |
|
Peritoneal fluid |
|
Saliva – in a dental setting as it is generally mixed with blood and may be contaminated |
Not all bodily fluids are included under universal precaution measures. The following are those that are not included.
|
Urine |
|
Feces |
|
Nasal secretions |
|
Sputum |
|
Vomitus |
|
Perspiration |
|
Saliva – outside of a dental setting |
Universal Precautions for Health and Safety
Precautions and techniques that help ensure the safety of health care workers from the transmission of infectious conditions include barrier precautions, hand washing and the careful handling and disposal of sharp medical instruments.
Barrier Precautions
The use of protective barriers is a very important aspect of universal precautions. These barriers, called personal protective equipment, include wearing the following items.
|
Gloves |
|
Gowns |
|
Lab coats |
|
Shoe covers |
|
Aprons |
|
Masks |
|
Protective eye wear such as goggles or glasses that have protective side shields, |
Wearing these items protects the workers and reduces their risk to possible exposure of their skin and mucus membranes from infectious conditions.
Hand Washing
Universal precautions also instruct individuals to wash their hands immediately after removing their gloves. Hand washing is a very effective technique for preventing the spread of infections.
Proper Handling and Disposal of Medical Instruments
Proper handling and disposal of sharp medical instruments that can transmit infection to a health care worker are outlined in the universal procedures measures. Hypodermic needles and scalpels are two of the items that pose the most danger. Careful handling and cleaning of medical instruments and disposal of needles in a special puncture resistant containers are essential.
Following universal precautions for health and safety are steps that minimize the risk of becoming exposed to infectious conditions.
OSHA has guidelines in place to keep people safe while they are at work. There are hundreds of jobs in different industries that follow guidelines set out for them by OSHA. One of these industries is Dental Offices. Dentist are doctors so the OSHA guidelines for a dentist office are often strict and must be followed to insure the health and safety of the employees as well as the patients that come in on a daily basis. There are over 150,000 dentist thoughtout the country. The OSHA guidelines for a dentist office make sure that all of them are working safely and following the proper procedures in order to keep you healthy. In a dentist office just like any other medical building there is no room for mistakes or accidents to occur.
Personal Protective Equipment In A Dentist Office
As with any job you are required to wear certain protective gear when working in a dentist office. This protective gear is intended to keep you safe from bacterias and germs you will incounter during your workday. One of the most important pieces of personal safety clothing is your labcoat or scrubs. They will help to reduce the number of germs that get onto your body. You must wear these whenever you are with a patient. Since you are working in their mouths it is bound to be full of germs and often times blood. This leads right into the absolute most important piece of safety clothing you will ever wear protective gloves. Since your hands are going to be in another persons mouth and touching all kinds of equipment you must wear gloves. They will prevent any blood or bodily fluids from getting on your hands and than being transfered to your eyes, nose or mouth. Also if there is even a small cut or abrasion on your hands or fingers viruses and bacteria can enter your bloodstream. Wearing a face mask will protect you from airborne viruses such as the common cold. There are also several more serious illnesses that can be transferred in the air.
Dental Equipment Safety Guidelines
There are many types of equipment that are used in the dentist office. Only people that are certified and trained to properly use this equipment should be allowed to work with it. While modern technology has made it easier to use medical equipment that can be thrown away after one use there are still some pieces of equipment are just too expensive or to difficult to make safely to be disposable. Under these circumstances sterilization becomes an important issue. If the equipment has to be reused on several patients it must be completely sterilized after each use.Under these circumstances sterilization becomes an important issue. If the equipment has to be reused on several patients it must be completely sterilized after each use. Below you will find out the best ways to safely sterilize dental equipment.
|
1. The most important things is to sterilize the equipment immediately. Leaving used equipment around the office can contaminate other equipment. |
|
2. You have to wipe down the equipment before it is put in the sterilization machine. This helps to get rid of any germs that may have been stuck on. |
|
3. Once the equipment has been cleaned you have to place it on the appropriate shelf. None of the equipment can be touching or overlapping. If they are there is a chance it will not be completely sterilized. |
|
4. Most machines will come with instructions on how long you must leave different equipment in the sterilizer. It is important to always follow these guidelines to insure they are fully clean and sterile. |
1. Personal hygiene
Good personal hygiene contributes to the prevention of infection in dental practice and also protects employees themselves against infections.
1.1 Nails
?Nails should be cut short and be clean1.
?Nail varnish should be intact, i.e. no chips or flakes.
?Artificial nails are not permitted.
Artificial nails can be a source of contamination.
1.2 Hair
?Hair should be clean.
?Long hair should be worn tied up or tied back.
1.3 Beards and moustaches
?Beards and moustaches should be well cared for and cut short.
1.4 Jewellery
?No rings, bracelets or wristwatches should be worn during work.
It is not possible to wash hands and/or lower arms if these are covered in jewellery
1.5 Use of handkerchiefs
?Paper handkerchiefs should be used during work.
?After use handkerchiefs should be immediately thrown away and hands should be washed or disinfected.
1.6 Eating, drinking and smoking
?In critical and semi-critical areas no eating, drinking or smoking is permitted. See Section 9.2 for the terms critical and semi-critical areas.
1.7 Clothing
?During the treatment of patients and the handling of used instruments clothing with short sleeves should be worn in order to make good hand hygiene possible.
?This clothing should be changed daily and in the case of visible contamination immediately.
?During treatment clothing should not be touched with the hands (gloves).
2. Infections
A dentist or an employee with an infection, for example a bronchial infection is a carrier of pathogenic micro-organisms, may be a source of contamination for patients and colleagues. Sometimes they should refrain from treating patients and should avoid contact with patients who are extra-sensitive to infections, such as patients who are being given immunosuppressants. If there is any doubt, it is a good idea to ask the advice of a doctor.
3. Immunisation
?All dentists and all the practice employees should be vaccinated against hepatitis B because of the risk of exposure to blood and the possible risks this causes.
Immunity to hepatitis B should be checked a month after the last injection. People who have not been vaccinated are subject to the guideline ‘Preventive iatrogenic hepatitis B’.
?A policy should be pursued relating to the vaccination status of employees for hepatitis B, polio, rubella and whooping cough and the registration of these in accordance with the national vaccination programme and the policy of the Commission for the Prevention of Iatrogenic Hepatitis B.
4. Hand hygiene
4.1 Introduction
The skin is composed of various layers, with microorganisms in the upper layers. The micro-organisms present can be roughly separated into:
− resident micro-organisms, or permanent flora and
− transient micro-organisms, or temporary flora.
The resident flora include the micro-organisms that are present in the deeper skin layers. These micro-organisms are virtually impossible to remove from the deeper skin layers. In general, resident micro-organisms are hardly pathogenic (a cause of illness). The transient flora include the micro-organisms that are on top of the skin and that have got there through contact with other people or with objects, etc. These micro-organisms are called transient because they can be easily removed by washing the hands with soap and water.
The hands are a major source of contamination. The effectiveness of good hand hygiene has been demonstrated for the prevention of infection . There is a difference between hand-washing using soap and water and rubbing hand alcohol into the hands .Hand washing and rubbing the hands with hand alcohol are regarded as the most important measure for reducing the risk of the transfer of microorganisms from one person to another or from one body part to another.
Hand alcohol is the collective name for the alcohol preparations that are used for non-preoperative hand-disinfection and it can be based on either ethanol or isopropanol. The addition of chlorohexidine or another disinfectant does not contribute to the immediate germicidal effect that alcohols already have , however, this does have a longer-lasting effect . In view of the usual duration of dental interventions (less than two hours) this effect is not necessary.
N.B. The use of disinfectant soap or chlorohexidine scrub is not useful for the same reason.
N.B. The frequent use of soap (over 10 x a day) when replacing gloves between patients has dermatological disadvantages. For this reason too hand alcohol is recommended.
4.2 Hand washing or disinfecting?
For hand hygiene a choice can be made between washing the hands with soap and water and rubbing hand alcohol into them. The advantage of using hand alcohol compared with washing the hands with soap and water is that it costs less and is less harmful to the hands.
?If the hands are visibly contaminated, they should always be washed with water and normal liquid soap.
Hand alcohol does not clean the hands.
4.3 Hand washing or disinfection methods
4.3.1 Water tap
?The water tap should not be touched with the hands and should therefore have an elbow control, foot control or infrared sensor.
4.3.2 Dispensers
?Soap and hand alcohol dispensers should be designed in such a manner that they can be operated using the elbow and, when used, the hands cannot contaminate the soap in the nozzle.
?Dispensers should have a disposable reservoir that cannot be refilled. The entire bottle should be replaced when the dispenser is empty.
?The dispenser should be cleaned when the reservoir is replaced.
4.3.3 Wounds
?Open wounds on the hands or skin lesions should be covered with a waterproof plaster, even if gloves are worn.
4.3.4 Drying
?Disposable paper towels should be used for drying the hands.
4.3.5 Creams
If the hands are washed, it is important that a fairly rich hand cream is used from a tube or dispenser so that the hands remain unblemished despite the frequent washing.
?Creams should be used from small tubes or from dispensers with disposable containers that are not refilled.
The use of a cream helps to prevent the drying-out of the skin.
4.3.6 Technique for hand washing
|
1. Wet the hands with water from a fast-running tap and cover them with a layer of liquid soap from a dispenser without touching the tap or the dispenser. |
|
2. Rub the hands together vigorously for 10 seconds; the soap should be rubbed well into the fingertips, the thumbs, the areas between the fingers and the wrists. |
|
3. Rinse the hands well. |
|
4. Turn off the tap as indicated in section 4.3.1. |
|
5. Dry the hands with a disposable towel, including the wrists and the skin between the fingers. |
|
6. Throw the used towel into the waste bin intended for this purpose. |
4.3.7 Technique for rubbing hand alcohol into hands
|
1. Apply the hand alcohol from the dispenser to the dry hands without touching the dispenser’s nozzle. |
|
2. Take sufficient hand alcohol to fill the hollow of one hand [1]. |
|
3. Carefully rub the hands together for around 30 seconds until they are dry. The hand alcohol should also be rubbed well into the fingertips, the thumbs, the areas between the fingers and the wrists. |
N.B. Certain parts of the hands are often forgotten. Frequently forgotten parts of the hands are the fingertips, between the fingers and the thumbs.
4.4 Indications for hand washing / disinfection
Hands should always be washed or be rubbed with hand alcohol:
− before and after each patient;
− after blowing one’s nose;
− after coughing and sneezing;
− after a visit to the toilet;
− before handling equipment that is ready for use;
− after handling used equipment.
5. Personal protective equipment
5.1 Gloves
Wearing gloves:
− prevents hands coming into contact with blood, saliva and mucous membranes. This is important because of the risk of contamination of the dentist or the employee.
− reduces the risk of micro-organisms being transferred from one patient to another via the dentist’s or employee’s hands.
5.1.1 Non-sterile gloves
?Gloves should always be worn when the hands come or could come into contact with blood, saliva, mucous membranes or with treatment materials and contaminated equipment that has been in contact with these.
Gloves should be removed immediately after these treatments. They should not come into contact with clothing and equipment in the surrounding area such as telephones, door handles, instruments, keyboards, etc.
?New gloves should be worn for each patient.
Working without gloves is only allowed when using a “no touch” technique.
?Immediately after the gloves are removed they should be put into the waste and the hands should be washed using soap and water or be rubbed with hand alcohol.
Wearing gloves is not an alternative to hand-washing or disinfection. Refer to the WIP guideline: Personal protective equipment.
?Approved gloves meet the prescribed standards that are shown on the packaging. In The Netherlands this is the standard for gloves that provide protection against chemicals and micro-organisms (EN 455-1/2/3).
Latex gloves may contain substances that cause strong allergic reactions in people who are sensitive to them . In this case latex-free gloves should be used. This applies to all employees at the practice.
?Washing or disinfecting gloves (using hand alcohol) between patient treatments is not permitted.
Gloves can “break down”, which means that they let moisture through small, unnoticed holes. Moreover, the quality of the gloves can significantly deteriorate because of the effect of disinfectants, oils and lotions .
?If the gloves are damaged during treatment by needles or other sharp objects, new gloves should be put on.
5.1.2 Sterile gloves
?If sterile surgical interventions are carried out, the gloves worn should be sterile.
A sterile intervention is when there is contact with sterile tissue and bone is exposed. Examples are the removal of impacted elements and the preparation and placing of implants and apex resections (see Section 10, Surgical Interventions).
?Before sterile gloves are put on, hand alcohol should be rubbed into the hands.
?If gloves are damaged during treatment by needles or other sharp objects, new gloves should be put on.
5.1.3 Rubber gloves
?Sturdy gloves should be worn when cleaning equipment.
5.2 Eye protection
The purpose of eye protection is to protect the wearer against airway secretions or splashes and squirts of blood or other bodily fluids, secretions or excretions.
There are three ways to protect the eyes:
– Protective glasses
Normal glasses cannot serve as protective glasses because in the case of splashes or squirts the head turns away on a reflex and the sides of normal glasses do not offer any protection.
– Face shield
– Mask with splash shield.
?Eye protection should be worn for treating every patient where there is a risk of splashes or aerosols of blood, saliva or rinse water and when handling soiled equipment.
?The reusable eye protection should be cleaned and then disinfected with 70% alcohol after every treatment that involves contamination.
5.3 Mask
?A surgical mask should be worn for treating every patient where there is a risk of splashes or aerosols of blood, saliva or rinse water and when handling contaminated equipment.
?A new mask should be used for every patient. This also applies if the mouth/nose mask gets wet.
A normal surgical mask can provide the protection. This mask provides protection against splashes but does not provide protection against the breathing in of small droplets.
The circumstances under which the use of eye protection and a mask should be used are the same; they should therefore always be worn together.
6. Accidental contact with blood
Accidental contact with blood means exposure to blood or to bodily fluids that have been visibly contaminated with blood by a percutaneous wound or through contact with mucous membrane or broken skin .
Accidental contact with blood as a result of puncture/cut accidents occurs mainly in the following situations:
− while cleaning sharp equipment (over half of cases),
− while carrying out interventions (around 40% of cases),
− while administering a local anaesthetic,
− while returning a needle to a sleeve.
In addition, a prick accident can occur when placing an unprotected used needle in a needle container. People can also prick themselves on unprotected needles.
Accidental contact with blood will occur more often in situations of high work pressure and in particular in critical situations.
6.1 Prevention of accidental contact with blood
|
?First and foremost work should be carried out as tidily and as orderly as possible. |
|
?Equipment should be cleaned by machine instead of by hand. |
|
?Gloves should be worn during the administration of anaesthetic. |
|
?Needles should not be bent, broken or otherwise manipulated. |
|
?Needles should not be guided using the fingers. |
|
?The disposable needle used for (re)anaesthetising a patient should be placed back into the sleeve using one hand only. |
|
?The needles should be placed in a needle container after use. |
|
?The needle containers should meet the set requirements . The containers are made of hard plastic and have a device that makes it possible to separate the needle from the syringe or the needle holder without touching the needles with the hands. The needle containers should close in such a way that they cannot open spontaneously and cannot be reopened. It should not be possible to puncture the containers with needles and the containers should be leak-proof. |
|
?Needle containers should be regularly replaced. The needle containers should not be overfilled. Therefore they should not be filled above the line indicated on every needle container. |
|
?For the handling of used equipment gloves should be worn that protect against pricks and cuts. |
6.2 Procedure following accidental contact with blood
?Following accidental contact with blood lets the wound continue to bleed and rinse the wound (using water or physiological salt). Then disinfect the wound using a skin disinfectant.
In the case of contamination of the mucous membranes rinse immediately and as well as possible with water or physiological salt. This water or physiological salt should not be swallowed.
?Every dental practice should make arrangements about the further treatment of accidental contact with blood. This can be done in various ways, for example via the Occupational Health & Safety Inspectorate or the GGD (Municipal Health Service).
Extended policy on accidental contact with blood is set out in the national guideline: Accidental puncturing .
7. Cleaning, disinfection and sterilization
7.1 Definitions
7.1.1 Cleaning
Cleaning is the removal of visible dirt and visible and invisible organic material in order to prevent micro-organisms being able to remain, multiply and spread.
7.1.2 Disinfection
(Thermal or chemical) disinfection is the reduction in the number of micro-organisms (bacteria, mould or viruses) on lifeless surfaces and on intact skin and mucous membranes to a level that is regarded as acceptable.
7.1.3 Sterilization
A process that kills or deactivates all the micro-organisms on or in an object in such a way that the risk of the presence of living organisms per sterilized unit is smaller than one in a million.
7.2 Disinfecting or sterilizing equipment?
There are three distinct categories with regard to the treatment of equipment in order to make it suitable for reuse: critical, semi-critical and non-critical use. The table below sets out the application of these categories and the method of decontamination.
|
Table 1: Treatment of equipment to be reused CATEGORY: |
INSTRUMENT IS USED FOR: |
DECONTAMINATION METHOD |
|
Category A: critical use |
Invasive interventions in which there is contact with sterile tissue. |
Cleaning and packaged sterilization. |
|
Category B: semi-critical use |
Interventions with demonstrable risks as a result of the transfer of micro-organisms, such as check-ups, removal of plaque, curetting, dentures, extractions and root-canal work. |
Cleaning and thermal disinfection or unpackaged sterilization. |
|
Category C: non-critical use |
Interventions in which the risk of transfer is very small, such as orthodontic work, prosthesis work, fluoride treatment and the taking of X-rays. |
Cleaning and thermal disinfection. (Use chemical disinfection if equipment is not resistant to thermal disinfection.) |
7.3 Disinfection
Disinfection should be limited to situations in which sterility is not required but in which cleaning alone does not sufficiently reduce the level of contamination. If disinfection is necessary, thermal disinfection is preferred. Thermal disinfection is carried out using water at a temperature of 65 – 100°C or using steam. Refer also to the WIP guideline: Policy on cleaning, disinfection and sterilization. For surfaces and objects that are not resistant to high temperatures chemical disinfection should be chosen. Cleaning should always precede thermal and chemical disinfection. The instrument washing machines combine machine cleaning and thermal disinfection.
The following remarks are important for the correct application of disinfection:
− before disinfection always clean well first
− use chemical disinfection only in situations set out in the guideline
− use only legally permitted disinfectants (see below)
− dilute and dose in accordance with statutory instructions as stated on the instruction leaflet or the label.
7.3.1 Disinfectants
The following disinfectants are eligible for use in dental practice:
− Alcohol
Alcohol is used for disinfecting skin and hands. Refer to the WIP guideline: Hand hygiene.
70% alcohol without any additives is used for disinfecting small surfaces and objects.
Duration: wet the surface well and leave to dry in the air; in the case of immersion leave for 10 minutes.
− Chlorine preparations
250 ppm of chlorine can also be used for surface disinfection.
For surfaces that have been contaminated with blood or other bodily fluids a 1,000 ppm of chlorine solution is used (250 ppm = 0.025% and 1,000 ppm = 0.1% of free chlorine).
Duration: wet the surfaces well and leave to dry in the air.
− Peroxides
Hydrogen peroxide, peracetic acid and sodium perborate are used. Peracetic acid is permitted as an instrument disinfectant and sodium perborate as a disinfecting storage fluid in case cleaning is delayed for some time. Peroxides are corrosive for a lot of materials including non-eloxated aluminium, brass, rubber and textile.
7.4 Sterilisation
? Sterilisation is required for critical equipment, substances, etc. that come into direct contact with sterile tissues or organs. The sterilisation of equipment that is intended for reuse takes place in a steam steriliser.
7.4.1 Steam sterilisers (autoclaves)
? The steam steriliser should be suitable for the intended use.
The supplier should be asked if the equipment provided is suitable for the instruments likely to be sterilised.
Steam sterilisers (autoclaves) can be bought in various sizes and types. Particularly important for the steam-sterilisation process is the removal of air from the steam steriliser, hollow instruments and packaging; as well as the drying of sterilised products. These processes are described in sections 7.4.1.1 and 7.4.1.2.
7.4.1.1 Removal of air from steam steriliser, hollow instruments and packaging
The presence of air obstructs the sterilisation process. The following principles are mostly used to remove the air from the steam steriliser.
− Removal of air through displacement with steam
This principle is used in simple autoclaves and pressure-cookers. Steam is produced in the steam steriliser room by boiling water; the pressure in the steam steriliser room increases somewhat. The steam mixes with the air in the steam steriliser room and escapes from the steam steriliser room via a ventilation opening. The longer the boiling and ventilation, the more air is forced out of the steam steriliser room until there is virtually pure steam in the steam steriliser room. The pressure then continues to increase to 1 or 2 bar, whereby the sterilisation temperature of 121°C or 134 °C is reached. The major advantage of this principle is the simplicity and the consequential low costs for which a steam steriliser can be produced. However, the disadvantage of this is that the air cannot be removed from hollow objects.
− Removal of air using a multiple deep vacuum
This is the most effective way of removing air, not just from the steam steriliser room but also and – in particular – from hollow instruments. The air is actively removed from the steam steriliser room and the products using a vacuum pump. When the air has been removed, the steam can simply penetrate into the hollow instruments. The major advantage of steam sterilisers that use a fractionated vacuum is that they can sterilise a large range of instruments.
The types of air removal described here are the two extremes. There are more ways of removing the air from the steam steriliser room and the load. All types of air removal can in theory be used; however, the suitability depends on the instruments to be sterilised. The manufacturer of the steam steriliser should carry out tests to demonstrate the suitability of the sterilisation process for the instruments.
N.B. A common practice in the
7.4.1.2
Drying the sterilised products
The laminate in which the instruments are packaged should be dry when the steam steriliser door is opened. Wet packaging lets bacteria through, which means that the contents will not remain sterile. The products can be dried in the steam steriliser using a vacuum pump or by blowing filtered air through them (for a long time).
? Instruments that need to be sterile (as they are used to puncture mucous membranes) should be sterilised packaged and stored packaged after the sterilisation process; therefore, the steam steriliser should be capable of drying the packaging and the contents at the end of the sterilisation process .
7.5 Methods to clean, disinfect and sterilise instruments
7.5.1 Cleaning
? The instruments should be cleaned before the disinfection or sterilisation process; great care should be taken with the inside of hollow objects. The inside can be cleaned using inter-dental brushes or a water pressure gun.
? The instruments should be properly dried after cleaning.
7.5.2 Sterilisation of instruments in category A (see Table 1).
? Separate instruments should be packaged before they are placed in the steam steriliser.
Separate instruments are best packaged in laminate bags that are specially intended for steam sterilisers. The laminate bags should meet the requirements set out in NEN-EN868-5 (Packaging material and systems for medical devices to be sterilised – Part 5: Hot-sealable laminate bags and hot-sealable laminate on a roll manufactured from paper and plastic film – Requirements and test methods). There are various sizes of laminate bags, which should be sealed; and there is laminate on a roll, which should be sealed on both sides. It is not enough to close the laminate bags by folding them over unless bags with an adhesive strip are used. Sets and sharp or delicate instruments can be packaged and sterilised in wire baskets with a single or double layer of ‘non-woven’ around them. Sheets of ‘non-woven’ should comply with NEN-EN868-2 (Packaging material and systems for medical devices to be sterilised – Part 2: Sheets of packaging material for sterilisation requirements and testing methods). Further information about the method of packaging using sheets of ‘non-woven’ is given in the NEN guideline R3210 (Packaging of medical devices to be sterilised in institutions and sterilisation companies).
? If there is no indicator strip on the packaging material, a piece of indicator tape should be attached. This indicator strip (or tape) can prevent confusion with non-sterilised instruments.
? After completion of the disinfection process, hands should be washed or rubbed with hand alcohol before the instrument washing machine is emptied.
? There should be a clean area for the load that comes out of the steam steriliser.
? The load should be left to cool for at least half an hour after sterilisation.
? The sterilised instruments should be stored in their packaging in a clean, dry, dust-free place.
? A sticker should be attached to the laminate side of the packaging stating the sterilisation date and the date until which the sterility is guaranteed.
? The shelf life of packaged sterilised products is six months as long as the storage of the sterilised products is in closed drawers or cupboards.
? Sterilised packaging is vulnerable. The following things should be taken into consideration.
− Do not write on the packaging; instead, attach an pre-written sticker to the laminate packaging. A pen will easily puncture the paper or the laminate.
− Do not make bundles of laminate bags; therefore, do not use staples, paper clips or elastic bands.
− Do not cram laminate bags into cupboards or drawers.
− Do not store laminate bags in places where they could get damp or wet, such as on the kitchen sink unit.
7.5.3 Sterilisation of instruments in category B (see Table 1).
? If the decision to sterilise is taken, the sterilisation should be carried out in the same way as the sterilisation of instruments in category A, with the difference being that these instruments do not need to be packaged.
? There should be a clean area for the load that comes out of the steriliser.
? These instruments should be stored in a clean, dry, dust-free place (e.g. in a closed cupboard or drawer) after sterilisation.
7.5.4 Thermal disinfection of instruments in category B
? Thermal disinfection should be carried out in an instrument washing machine that is designed in such a way that the inside of instruments with hollow spaces is also cleaned and disinfected adequately. This machine cleans and disinfects in a single process. Specifications should comply with NEN-EN-ISO 1588-3-1.
? After completion of the disinfection process, hands should be washed or rubbed with hand alcohol before the instrument washing machine is emptied.
? There should be a clean area for the load that comes out of the instrument washing machine.
The disinfected instruments should be stored in a clean, dry, dust-free place.
7.5.5 Disinfection of instruments in category C ( see Table above)
? Instruments in category C that are also used for category A or category B should be treated as instruments in category A or B. Although this is not necessary for instruments in category C, this avoids a risky misunderstanding.
? Instruments that are used only for category C should preferably be cleaned and thermally disinfected in an instrument washing machine.
If thermal disinfection is not possible because instruments are resistant to this procedure, the instruments should be cleaned and properly dried, then chemically disinfected by being immersed for 10 minutes in 70% alcohol; they should subsequently be dried in the air.
The alcohol container should be closed off with a lid. The alcohol should be refreshed daily. The container should be emptied, cleaned, dried and then refilled with alcohol.
? Hands should be washed or rubbed with hand alcohol before the disinfected materials are touched.
? The disinfected instruments should be stored in a clean, dry, dust-free place.
7.6 Methods to clean and disinfect other instruments
When dental (extraction) equipment is bought, the possibility of being able to clean it should be an important consideration. Smooth surfaces, smooth hoses and foot operation of chair, treatment unit and waste bucket contribute to the reduction in the risk of contamination and make good cleaning possible.
7.6.1 The treatment chair
? The treatment chair should have as many smooth surfaces as possible.
? The chair should be cleaned using water and a detergent immediately after it becomes visibly contaminated and on a daily basis at the very minimum.
? If there are splashes of blood on the chair, these should be immediately removed with a tissue; then the cleaned surface should be disinfected with 70% alcohol. When purchasing a chair, it should be checked that the chair material is resistant to disinfection agents containing 70% alcohol.
7.6.2 Handles
? The handles of lamps, X-ray equipment, treatment units, touch-control panels, timer buttons, etc, that are touched during the treatment of the patient should be disinfected with 70% alcohol after the completion of the treatment. If the handles are visibly contaminated, they should be cleaned with water and a detergent before they are disinfected.
An alternative to this is to wrap the handles in disposable plastic film and replace this after each patient.
If this is not possible, the handles can also be replaced and thermally or chemically disinfected.
7.6.3 Dental tray
? The use of a disposable dental tray is preferred.
? A non-disposable tray should be disinfected after each patient with 70% alcohol. If the tray is visibly contaminated, this should first be cleaned with water and a detergent. An alternative to cleaning is to cover the tray with protective waterproof material; subsequently, this need only be disinfected and changed.
7.6.4 Multi-function syringe
The tip of the multi-function syringe should not be reused.
? After each patient, the multi-function syringe should be rinsed for 10 seconds with water and air. The used tip of the syringe should be removed before rinsing.
? The outside should be disinfected with 70% alcohol after each patient.
7.6.5 Holders
? The holders of rotating instruments, extraction hoses, multi-function syringes, etc. should be disinfected with 70% alcohol after each patient. In the case of visible contamination, this should be preceded by cleaning with water and a detergent. Only after disinfection of the holder should the disinfected instruments be returned to this. The order this occurs in is very important.
7.6.6 Extraction unit
? The extraction hose should be briefly rinsed with clean water after each patient.
? The extraction hoses should be cleaned at the end of every day by sucking up a detergent in warm water through the hoses.
The choice of detergent depends on the manufacturer’s instructions. If the wrong detergent is used, the formation of foam can result in problems occurring in the extraction unit’s motor.
? When the screen or the hoses of the extraction unit are cleaned or replaced, there is always the risk of splashes.
? Gloves (rubber), mask and protective glasses should be worn when the amalgam separator is cleaned or replaced.
7.6.7 Spittoon
? The spittoon should be properly rinsed with water after every patient. If necessary (if it is visibly contaminated), first left-over impression material, etc. should be removed and then the spittoon should be cleaned with a tissue using water and a detergent.
7.6.8 Other dental equipment
? The operating controls that are touched should be cleaned after use with water and a detergent, and then disinfected with 70% alcohol.
? The (soft) laser should be fitted with replaceable tips, which should be thermally disinfected after use. The lightstick should be thermally disinfected and the lamp should be disinfected with 70% alcohol.
7.6.9 Hand pieces and other intraoral instruments
As a result of the technical design of hand pieces and other intraoral instruments, there will be contamination of the inside of these pieces during use. Consequently, it is necessary to clean these then to disinfect or sterilise them after use for each patient.
The cleaning of hand pieces and other intraoral instruments requires special attention. The rinsing of these, as is done before sterilisation, cannot be regarded as cleaning. In addition to the removal of any blood and saliva, good cleaning means the removal of any remaining oil. This requires treatment with a detergent.
After sterilisation or thermal disinfection, the hand pieces and other intraoral instruments can be oiled. Only by following the steps – cleaning, thermal disinfection or sterilisation, and oiling – in this order can there be sufficient certainty that the handpiece is microbiologically safe.
There is special equipment for the cleaning, disinfection or sterilisation and oiling of hand pieces and other intraoral instruments. The purchase and use of this equipment is strongly recommended, also for reasons of microbiological safety. This also saves on maintenance costs and ensures that the hand pieces and other intraoral instruments last longer.
7.6.10 Administrative equipment
? Administrative equipment should preferably be outside the splash zone.
? Computers, telephones and other office equipment should be cleaned domestically.
Keyboards and mice can best be protected with a flat, smooth, plastic cover that is easy to clean and to disinfect or can be replaced.
? If this equipment is touched with contaminated hands or gloves during treatment, it should also be disinfected after treatment.
7.7. Disinfection
In general cleaning does not need to be followed by disinfection .
If blood is spilt on surfaces, furniture or objects, the contaminated spot should be immediately cleaned and then disinfected with 70% alcohol, or with 1,000 ppm of chlorine. Large surfaces cannot be disinfected using alcohol because of the risk of fire. The contaminated spot should be dried in the air after disinfection. Prior cleaning is required as disinfectants are to some extent rendered ineffective by organic material such as blood (proteins) .
7.7.1 Maintenance of the cleaning and disinfection material
? Disposable materials should be used as much as possible.
? Cleaning material that is reused should be cleaned, dried and cleared away daily after the work has been carried out. This helps to prevent cleaning being carried out with contaminated objects and the opposite result being achieved: an even greater contamination.
? If brushes are required, plastic brushes should be used as wooden brushes are difficult to clean.
? If a brush is used for cleaning an item that is potentially contaminated with blood, the brush should be disinfected after cleaning for at least five minutes using a 1,000 ppm of chlorine solution, then rinsed, dried completely in the air and stored dry.
? If a bucket is used for cleaning an item that is potentially contaminated with blood, the bucket should be disinfected after cleaning for at least five minutes using 1,000 ppm of chlorine.
? Disposable absorbent cloths should be used. If these are reused, they should be washed in a washing machine.
8 Removal of waste
? Household waste should be put out for the refuse collection service in the usual way.
? Material that is contaminated with blood should be placed in a sturdy plastic bag before it is deposited in the dustbin.
? Full needle containers are seen as waste that has a risk of infection; therefore, they may not be put out with the normal waste. The best thing to do is to hand them over as chemical waste (using an environmental box).
? The content of screens and extraction units, and left-overs from the amalgam separator should be thrown away as chemical waste.
9 Safe working practices in dental practice
9.1 General
? The dentist and the employees should adopt safe working practices and pay ongoing attention to the prevention of infection; in other words, in accordance with the ‘best practice’ rules of dentistry.
? Treatments should be carried out in such a way that the risk of contamination for the dentist, patient, employees and workplace is minimised. The underlying notion for this is that work should be carried out with assistance. Other important conditions are the organisation of the practice, the ergonomic layout of the practice, the correct routing of clean and contaminated equipment, a tidy workplace, and application of this guideline.
9.2 The work area
The optimum separation of ‘clean’ and ‘unclean’ aspects – such as the layout of the practice, the materials, the routing and the treatment – is an essential basis for hygienic practices.
The areas in the dental practice should be categorised as:
− critical areas (treatment room, laboratory, area where the instruments are cleaned and disinfected)
− semi-critical areas (toilets)
− non-critical (public) areas (entrance, corridor, office, waiting room).
9.2.1 Layout
? There should be separate areas within the dental surgery for treatment and administration; as well as for cleaning, disinfection and the sterilisation of equipment and materials.
9.2.2 Furnishing
The treatment room should have sufficient worktop surfaces, with a clear separation between ‘clean’ and ‘unclean’. The hand-washing unit should always be located on the ‘unclean’ worktop.
? The areas for cleaning, disinfection and sterilisation should be divided into a clean and a contaminated area. Cleaning and disinfection should take place in the contaminated area; packaging and sterilisation should take place in the clean area.
? During furnishing, attempts should be made to ensure that all the surfaces can be cleaned easily and properly.
? Smooth surfaces without seams and cracks are preferred as these can be cleaned more easily.
? As little separate equipment and material as possible should be placed on the worktops. Equipment and materials that are used only occasionally should be stored in closed cupboards.
This reduces the risk of contamination and means there is less to be cleaned.
? Clean and sterile equipment and materials should be stored in closed cupboards or drawers.
Clean, dry cupboards are required for the storage of equipment, and there should be sufficient room in these cupboards to store the equipment separately. An overfull drawer or cupboard causes crumpled packaging, which can cause hair cracks in the packaging that may result in the sterility of the contents being affected.
9.3 The treatment unit
There are two major problems with regard to the treatment unit: contamination of the inside caused by a reflux of water into the system when the spray water feed is turned off; and a reduction in the microbiological quality of the water because it stagnates in the pipeline.
9.3.1 Reflux
A treatment unit should have a device that prevents the reflux of water in the pipes (anti-retraction valves).
9.3.2 Stagnancy of water in the pipes
Stagnancy of water (at night and at the weekend) causes the formation of a biofilm on the inside of the plastic pipes of the unit and the growth of various bacteria, including Legionella . Rinsing these pipes achieves a 10-fold – 20-fold reduction in the number of distally forming bacteria .
? In the morning and before the first treatment, all the pipes running from the unit to the instruments (multi-function syringe, airotor, micromotors, assistant’s multi-function syringe, cavitron) should be rinsed; and it must be ensured that all the instruments/openings are separately rinsed through for at least 30 seconds.
? The used pipes, without the hand pieces and other intraoral instruments, should be rinsed through for at least 10 seconds between consultations. This is not necessary if instruments with anti-retraction valves are used.
Disinfecting the pipeline system and/or adding a disinfectant to the unit water results in a water quality that in many cases meets the required bacteriological standard of <200 kve/ml .
When a new unit is purchased, it is recommended that a unit be chosen which has an integrated, often semi-automatic water disinfection system. These modern units usually guarantee an easy, reliable disinfection of the water and the pipes. Units with this kind of system should be fitted with a reflux device (BA safety device) to prevent the water flowing back into the network (NEN-EN 1717).
Units that are not yet ready for replacement can be disconnected from the water pipe and fitted with a bottle that makes it possible to (manually or automatically) disinfect the bottled water and, thus, the water in the unit’s pipes. Compressed air in the unit should then be used to move the water-plus-disinfectant from the bottle into the pipes. In general, disinfectants with hydrogen peroxide or preparations based on peroxides produce good results . The concentration of the hydrogen peroxide in the bottled water is around 300 ppm (0.03%). This can be checked using peroxide test strips. Pipes on units with a bottle device can also be disinfected by leaving a special disinfectant in the pipes over the weekend. Ordinary tap water can then be used in the bottle during the week.
9.4 Other materials
9.4.1 X-ray equipment
? The X-ray equipment may be operated with used gloves as long the parts touched are disinfected with 70% alcohol following the end of the treatment.
? The packaged image should be rinsed with tap water before it is inserted into the developer. This is not necessary if a system is used that has a separate protective film around the image.
? Parts of the developer that have been touched should be disinfected using 70% alcohol.
Digital X-ray equipment uses a sensor that is connected to the computer via a cable or phosphorous plates.
? The sensor is used with a sleeve; this should be put in the waste after use.
? The phosphorous plate is used with a sleeve that should be disinfected using 70% alcohol after use; the sleeve should then be removed and put in the waste. The phosphorous plate caow be read in.
9.4.2 Impression material
? Before impression material can be sent off, it should be cleaned using water. Then the impression should be immersed in 0.1% hypochlorite for five minutes. The impression should then be rinsed under the tap and packed in a plastic bag.
? No soap should be used for the cleaning as this can adversely affect the quality of the impression.
9.4.3 Pieces of work that come from a dental laboratory
? Pieces of work from a dental laboratory should be rinsed and disinfected using 70% alcohol before they are tried or fitted.
? Pieces of work that are returned to a dental laboratory should be disinfected in the same way as impressions.
10 Surgical interventions
? An assistant should always be present when surgical operations take place. Sterile operations should be carried out in an independent treatment room that meets the requirements set out in the WIP guideline: Circumstances during (minor) surgical and invasive procedures (Tables 2 and 3).
? The dentist and assistant(s) should wear (a) clean protective jacket(s) and the other personal protective equipment.
? The patient’s face should be covered with a sterile cloth (also a sterile area).
? In the case of surgical operations, sterile equipment and sterile materials should be used that have been laid out in a sterile area.
? The rotating instruments should be connected to an external water-cooler that is supplied with sterile water or a sterile physiological salt solution.
? Sterile water or a sterile physiological salt solution should always be used for rinsing the wound area.
Dental chart
|
Ministry of Public Health of |
|
Medical documentation Form №043/о By order of MOPH of Ukraine 27.12.99 №302 |
||||||||||||||||||||||||||||||||||||||||||||||||||||||||||||||||||||||||||||||||||||||||||||||||||||||||||||||||||||||||
|
Name of the clinic:
|
||||||||||||||||||||||||||||||||||||||||||||||||||||||||||||||||||||||||||||||||||||||||||||||||||||||||||||||||||||||||||
|
Dental chart №____ _____________year
|
||||||||||||||||||||||||||||||||||||||||||||||||||||||||||||||||||||||||||||||||||||||||||||||||||||||||||||||||||||||||||
|
First name, last name:
|
||||||||||||||||||||||||||||||||||||||||||||||||||||||||||||||||||||||||||||||||||||||||||||||||||||||||||||||||||||||||||
|
Male Female |
||||||||||||||||||||||||||||||||||||||||||||||||||||||||||||||||||||||||||||||||||||||||||||||||||||||||||||||||||||||||||
|
Birth date: |
||||||||||||||||||||||||||||||||||||||||||||||||||||||||||||||||||||||||||||||||||||||||||||||||||||||||||||||||||||||||||
|
Address:
|
||||||||||||||||||||||||||||||||||||||||||||||||||||||||||||||||||||||||||||||||||||||||||||||||||||||||||||||||||||||||||
|
Home phone: |
||||||||||||||||||||||||||||||||||||||||||||||||||||||||||||||||||||||||||||||||||||||||||||||||||||||||||||||||||||||||||
|
Diagnosis:
|
||||||||||||||||||||||||||||||||||||||||||||||||||||||||||||||||||||||||||||||||||||||||||||||||||||||||||||||||||||||||||
|
Patient complains:
|
||||||||||||||||||||||||||||||||||||||||||||||||||||||||||||||||||||||||||||||||||||||||||||||||||||||||||||||||||||||||||
|
General diseases:
Allergy: |
||||||||||||||||||||||||||||||||||||||||||||||||||||||||||||||||||||||||||||||||||||||||||||||||||||||||||||||||||||||||||
|
Objective examination:
|
||||||||||||||||||||||||||||||||||||||||||||||||||||||||||||||||||||||||||||||||||||||||||||||||||||||||||||||||||||||||||
|
date |
|
|
|
|
|
|
|
|
|
|
|
|
|
|
|
|
||||||||||||||||||||||||||||||||||||||||||||||||||||||||||||||||||||||||||||||||||||||||||||||||||||||||||
|
date |
|
|
|
|
|
|
|
|
|
|
|
|
|
|
|
|
||||||||||||||||||||||||||||||||||||||||||||||||||||||||||||||||||||||||||||||||||||||||||||||||||||||||||
|
date |
|
|
|
|
|
|
|
|
|
|
|
|
|
|
|
|
||||||||||||||||||||||||||||||||||||||||||||||||||||||||||||||||||||||||||||||||||||||||||||||||||||||||||
|
|
1 |
2 |
3 |
4 |
5 |
6 |
7 |
8 |
9 |
10 |
11 |
12 |
13 |
14 |
15 |
16 |
||||||||||||||||||||||||||||||||||||||||||||||||||||||||||||||||||||||||||||||||||||||||||||||||||||||||||
|
|
32 |
31 |
30 |
29 |
28 |
27 |
26 |
25 |
24 |
23 |
22 |
21 |
20 |
19 |
18 |
17 |
||||||||||||||||||||||||||||||||||||||||||||||||||||||||||||||||||||||||||||||||||||||||||||||||||||||||||
|
date |
|
|
|
|
|
|
|
|
|
|
|
|
|
|
|
|
||||||||||||||||||||||||||||||||||||||||||||||||||||||||||||||||||||||||||||||||||||||||||||||||||||||||||
|
date |
|
|
|
|
|
|
|
|
|
|
|
|
|
|
|
|
||||||||||||||||||||||||||||||||||||||||||||||||||||||||||||||||||||||||||||||||||||||||||||||||||||||||||
|
date |
|
|
|
|
|
|
|
|
|
|
|
|
|
|
|
|
||||||||||||||||||||||||||||||||||||||||||||||||||||||||||||||||||||||||||||||||||||||||||||||||||||||||||
|
C – caries, F – filling, A – absent(missing) tooth, P – pulpitis, Pt – periodontitis, Cr – tooth crown, r – root, Dc – dental calculus
Doctor_________________ Chief of department___________________
|
||||||||||||||||||||||||||||||||||||||||||||||||||||||||||||||||||||||||||||||||||||||||||||||||||||||||||||||||||||||||||

