Indications for restoration of defects of tooth coronal part by Pin teeth. Design of pin teeth. Cast post and core designs, sectional cast post and cores. Clinical and laboratory stages of manufacture
A post and core is a dental restoration, which is used to sufficiently restore a tooth morphology followed by future restoration such as a crown, when there is no an adequate part of tooth hard tissue regarding to the required clinical indication of the case, due to loss of tooth structure as a result of decay, fracture or other causes. Post and cores can be referred as one of the foundation restorations.
Treatment with a post and core
Post and cores divide into two main groups: prefabricated and cast. Both of these systems employ a post that is placed within the root canal of the tooth being restored. Thus the tooth must first be endodontically treated. After the endodontic procedure has been completed, and the root canal(s) is/are filled with the inert gutta percha root canal filling material, some gutta percha is removed from the canal space, usually by a series of endodontic files that prepares and shapes the root canal. The space that exists coronal to the remaining gutta percha, called the post space, is now available within which to place a post. It is desirable to leave sufficient root filling material in the apical area to maintain an apical seal.
Post space and associated length of post

![]()
The post on the left is a tapered post, the one on the right is a parallel post.
In post and core fabrication, it is desirable that the post descend at least two third of the length of root canal (or not less than the height of the crown) in order to provide sufficient retention.
Basically, it is important to leave at least 4 mm of gutta percha at the apex of the root canal, even at the expense of a longer post, because it is within the apical 4 mm of the root canal that the apical delta anastomose with the exterior surface of the root. Should these lateral canals not be blocked with the gutta percha and the cement used to place the gutta percha, the chances of microleakage and percolation of microbes are greatly increased, thereby increasing the likelihood of an endodontic failure.
It is not necessarily the length of the post within the root canal that provides for retention of the core, and thus the eventual crown, but rather the length of post that will exist within root structure that exists within surrounding bone. If the post is 16 mm long, but only extends 4 mm into root structure that is surrounded by solid bone, the restoration will have a poor prognosis. This consideration of crown-to-root ratio is essential when evaluating the tooth for a crown-lengthening procedure.
In the picture at right, the two teeth on the extreme left and right are the ones under discussion. The two teeth in the middle have been endodontically treated, but do not have post and cores.
Prefabricated post and cores

![]()
Maxillary posterior teeth restored with prefabricated screw posts.
Prefabricated post and cores take less time to place, as they do not involve any lab work and can be inserted immediately upon the decision to utilize them, once the endodontic therapy has been completed and the post space cleared of gutta percha. After the prefabricated post is properly cemented into the post space, a core material, such as Dental composite, can be packed around the cemented post. After the material has been cured or has had a chance to set and properly formed into a crown preparation, an impression can be taken for the fabrication of a prosthetic crown.
Metal prefabricated post systems are being superseded by fibre-reinforced composite resin post systems which offer improved resistance to untreatable fracture of tooth substrate such as vertical root fracture.
Cast post and cores
In cases where the post space is not a good match for a prefabricated post, a cast post and core can be custom fabricated for the tooth. A resin pattern is produced by placing a preformed plastic “burnout” post into the post space and a resin material, such as Duralay resin, is used to build up the tooth to the proper dimensions. When this is completed, the pattern resin/plastic post is removed from the tooth structure and attached to a sprue former, much in the same way as a is done with the wax pattern of a crown, and a single-unit cast post and core can thus be fabricated out of gold, titanium or another metal using the lost-wax technique. Where a metal post could be difficult to conceal a custom post made of zirconia oxide[clarificatioeeded] can be made, its tooth colour leaves less of a shadow under the final restoration. Alternatively, an impression can be taken of the post space and dental arch using a plastic post and a polyvinyl siloxane impression material, and this used to construct a suitable post in the dental laboratory.
Post design
There are many types of post designed available for cast post and cores, utilizing various combinations of the following properties:
- parallel vs. tapered
- smooth-sided vs. serrated vs. threaded
- post only vs. with additional single-circle ring
In a classic case one of the best design for a post to decrease the risk of failure is the narrowest & longest smooth, parallel post that one can fit into the post space. Utilizing the longest possible post ensures that the forces transmitted from the crown are distributed over as much of the root as possible. Using the appropriate diameter post ensures that as much natural tooth structure as possible is left to support the post and absorb the transmitted forces. A parallel post ensures the greatest retention of the post within the canal, and is perhaps utilized with only the slightest loss of tooth structure to the internal wall of the canal. A smooth-surfaced post, although less retentive than either serrated or threaded post surfaces, transmits the least amount of force to the root structure. While both smooth and serrated posts are passive, in that they simply lie within the post space after being cemented, threaded posts actively engage the internal walls of the root canal as they are screwed in, and, while being the most retentive by far, produce such a force on the brittle root structure that they are contraindicated in most situations.
The use of a post and core does not strengthen the tooth prior to restoration with a crown; rather, it may contribute to the weakening of the tooth structure, as the forces placed upon the future prosthetic crown and core are now transmitted along virtually the entire length of the brittle, endodontically treated tooth. This inherent drawback is taken into account when the prognosis of the finished restoration is determined and explained to the patient prior to the onset of treatment. It is because of this increased risk of failure inherent in the use of post and core restorations that, when all of the independent failure rates of the many procedures needed for the restoration of the tooth are considered together (endodontic treatment, crown lengthening (when indicated), post and core and prosthetic crown), the patient is sometimes advised to have the tooth extracted and an implant placed.
The post with additional single-circle ring increases the contact surface area between the core and involved hard tissue of tooth significantly, therefore this system does not require a post with at least 2/3 of the root canal depth as its indication.
Post and Core Foundations for Esthetic Restorations
The “foundation restoration” is an extremely important part of the restorative process.
When large, defective restorations are removed, the remaining tooth structure must be reinforced with a material that will act as a “dentin replacement” that will support and strengthen the resulting preparation. When restoring endodontically treated teeth, the foundation restoration (core) is anchored to the tooth via the root canal system, using a post that is first bonded or cemented in place. When posts are required prior to the restorative process, certain biologic factors must be considered. Conservation of tooth structure during post space preparation is essential, because placement of a post does not reinforce tooth structure, but provides retention and resistance form for the coronal restoration.1 One half of the post length should be surrounded by alveolar bone to prevent lateral forces on the tooth/restoration complex causing potential root fractures by transmitting forces from the end of the post to the adjacent root surface, and prevent separation and/or breakage of the post/core/restoration complex.2 When the post is carefully positioned and cemented to place, the core material must have intimate contact around the post surface to help anchor it in place. It is also important to have sufficient “ferrule” (at least 2 mm) so that loading forces are not concentrated at the core-tooth interface and thus transmitted to the post which can lead to post fracture, debonding of the core or vertical root fracture.The bulk of the “foundation restoration” will then be prepared like tooth structure, incorporating the core into the final preparation design.3
Requirements of a Foundation (Core) Material
Two important features of a core build-up material is that it bond well to enamel and dentin, and it prepare as much like tooth structure as possible so that ditching does not occur during preparation.4 Additionally, the use of the core forms make fabrication of properly formed cores that resemble preparation form fast and simple. The following case presentation will describe the use of prefabricated post-and-core foundation restoration in a decimated root-filled tooth.
Case Presentation
The patient in Figure 1 had root canal retreatment therapy completed on tooth No. 9. As seen in the clinical photograph, there was very little coronal tooth structure remaining. The author felt that the Flexi-Flange® Prefabricated Post System (Essential Dental Systems, http://www.edsdental.com) would be ideal for this clinical situation. A metal post was selected for this case due to lack of remaining tooth structure, but it is important to note that fiber versions of this post system are also available. Flexi-Flange helps to dissipate occlusal forces to eliminate intraradicular stress fractures. The flange portion of the post countersinks completely into tooth structure to maximize fracture resistance of the root and post by safely dispersing occlusal forces over a broad area. Combined with a second tier that adapts to the natural flare of the canal, Flexi-Flange reduces stress concentrations that cause fractures, while post strength and retention are dramatically increased.5-12
A digital x-ray was taken and the measurement tool was used to determine the amount of gutta-percha to be removed from the root canal space. The post-hole preparation began by using a Gates-Glidden drill to remove all but the apical 5 mm of gutta-percha. The transparent Flexi-Flange Depth gauge was used overlaying the radiograph to help the author select the appropriate size post for the diameter of the root present at the most apical portion of the post (Figure 2). A primary reamer corresponding to the selected post size was used to shape the root canal space coronal to the remaining root canal fill.
Next, the countersink drill/root facer was used to cut two preparations in one operation. It prepared a seat for the second tier of the post as well as the flange. It is critical that the post fully seat in the prepared space. This is determined by a flush seating of the flange within its preparation (Figure 3). A trial insertion of the Flexi-Post was made to ensure accuracy of fit and position. It is suggested that a radiograph be taken at this point to verify that the apical obturation is still properly positioned and has not been dislodged in the post preparation steps. Should the seal have been disrupted, new obturation material can quickly be placed and the post placement may continue.The wrench was used to create the thread line inside the root canal for the post. Using the wrench to carefully tighten the Flexi-Flange into post preparation will create a thread line into dentin that will be followed when the post is screwed to place during cementation. The flange must fully seat into the internal countersink preparation to strengthen the internal aspect of the tooth and to help dissipate occlusal forces that could cause failure of the post and overlying restoration.
After the post was unthreaded from the root, it could be shortened if necessary to allow complete seating of the flange. An x-ray was taken to verify complete trial seating (Figure 4). Next, a self-curing resin cement was placed in the post space (Flexi-Flow Auto E, EDS) and on the post itself (Figure 5). The post was then placed into the canal space with the wrench and screwed in to complete seat, and the excess cement was removed prior to setting with a sable brush, allowing visual verification of complete seating (Figure 6). Once the Flexi-Post was cemented to place, the appropriate core form was chosen and tried on the tooth, and trimmed with scissors as necessary, to ensure accurate fit. Flexible core forms were used because they could be more easily removed without torquing the set core material. A size and shape resembling a maxillary anterior tooth preparation was chosen and tried in place. The entire tooth surface was then etched with 37% phosphoric acid for 15 seconds, then thoroughly rinsed and air-dried, being careful not to desiccate the dentin (Figure 7). A fifth-generation dentin bonding agent (Figure 8) was applied to all tooth surfaces and light-cured for 20 seconds. The dual-cure core build-up material (Ti-Core Auto E, EDS) was injected into the core form and placed over the tooth, held in place with a plastic instrument, and light-cured through the core form.
Next, the matrix was sectioned using a small carbide bur (Figure 9 and Figure 10), and removed to avoid torquing the core material. The tooth preparation was then completed for the definitive restoration. After preparation, a double-cord technique was used to make the master impression. First, a #00 cord was placed circumferentially into the gingival sulcus followed by a #1 cord immediately above (coronal) to it. After removal of the top cord, a light-bodied impression material was syringed into the retracted sulcus followed by placement of the heavy-bodied filled maxillary full-arch impression tray.
The Definitive Restorations
Figure 11 shows the completed preparations for tooth Nos. 8 and 9. Note that the preparation for tooth No. 8 was very conservative and that the preparation color was normal to light. Because of the amount of missing tooth structure on tooth No. 9, and the darkness of the remaining root, both preparations were prepared with intra-crevicular margins. It is recommended to use a material that will adequately block or cover the low-value preparation (such as on tooth No. 9 in this case) and that the same type of restoration is chosen for the adjacent tooth to maximize the ability to esthetically match the restorations. For this case, zirconium (Lava™, 3M ESPE, http://www.3mespe.com) was chosen to predictably match the shade of the two maxillary central incisors being restored. Figure 12 shows the restorations at delivery after cementation. The definitive zirconium restorations were cemented using a self-etching resin cement. A new zirconium primer (Z-Prime™ Plus, Bisco, http://www.bisco.com) was used to increase the bond strength of the cement to the zirconium substrate.
Conclusion
A technique has been described using Flexi-Flange prefabricated posts in conjunction with Ti-Core core build-up material to build a solid post and core in a decimated root-filled tooth prior to fabrication of a full-coverage restoration. The unique design of the post helps to minimize stress by conforming to the root morphology and, due to the flange design, helps to dissipate functional stresses so critical to long-term success of post-filled teeth.

Figure 1
Figure 2
Figure 3
Figure 4
Figure 5
Figure 6
Figure 7
Figure 8
Figure 9
Figure 10
Figure 11
Figure 12
1. What is a post-and-core?
- A post-and-core is a metal component of an extensive tooth repair:
- It is a thin metal rod that is cemented into the root of a tooth.
- It consists of a post that fits into the root canal, and a core portion that projects above the gum.
- A new replacement crown will be cemented into position over the core.
|
|
|
|
;)
;)
2. Why is a post-and-core necessary after root canal treatment?
- Teeth that are treated for root canal problems are often badly broken down.
- They need to be built up before they can have a replacement crown fitted over them.
- Post-and-core fabrication is the method of choice for the build-up process.
|
|
|
|
|
|
;)
;)
;)
3. How is a post-and-core made?
- After a root canal treatment has been completed, the dentist will shape the root canal and pulp chamber.
- An impression of the prepared tooth will be taken, and a dental technician will make the metal post-and-core.
- The dentist will then cement the post-and-core into the root. The core and remaining tooth will be finally shaped before a replacement crown is made to fit over it.
- The x-ray below is of two post crowns. The posts have been cemented into the root that roots.
|
|
;)
4. Is a post-and-core always made in a dental laboratory?
- Prefabricated post systems are available.
- The dentist can select a suitable ready-made post and cement it into the root.
- A core is then built around the part of the post that projects above the root, using special materials.
- The replacement post crown can then be made and fitted.
After root canal therapy is completed on a tooth, several treatment options exist to restore the tooth’s form and function. The treatment choices include restorations that range from root canal access fillings to full-coverage restorations. Many times, in order to complete a full-coverage restoration, a post and core is necessary to provide structure. For a crown to be successful, there should be enough existing tooth structure to provide retention and resistance form, and enough sound tooth structure at the margin to create a ferrule effect and provide an adequate seal of the crown margin. When the structure does not exist to ensure retention and resistance form, then a core restoration or post-and-core restoration is required to replace missing tooth structure.
There needs to be enough remaining tooth structure to retain the core restoration, taking into account that the tooth will be prepared for a full-coverage restoration. When adequate retention does not exist for the core restoration, a post is used. It is important to remember that the purpose of the post is to retain the core restoration only. The post will not strengthen the tooth but rather weaken it by potentially leading to fractures within the remaining tooth structure. The exception might be the use of a post in a tooth that has a thin remaining coronal structure at risk of fracture. In this specific situation, it could be argued that a rigid post is actually preventing the thin coronal structure from fracturing.
When a post and core is necessary, many factors are involved in determining the type used and how the procedure is completed. One of the oldest and most predictable techniques involves the use of an indirect one-piece post and core. This type of post and core is typically cast from a metal, which is frequently a precious metal such as gold. The pattern is created directly in the mouth using either a resin or wax pattern. After the canal is prepared for the post, a starter post is used in the canal and surrounded by the pattern material to create an intimately fitting post. Then, the coronal section is created in the pattern material and shaped to the desired contour. The entire post-and-core pattern is removed from the tooth. This is then cast into a one-piece post and core and cemented to the tooth.
The advantages of this type of post and core include the fact that the post will fit intimately into the canal space even if the canal is not round. The fact that the post and core is one piece ensures that the core cannot break away from the post. However, the indirect post and core requires multiple patient visits and involves the use of a nonesthetic metal material that may show through ceramic restorations. The current trend is using a direct one-visit post-and-core technique.
A direct post and core involves placing the post-and-core restoration in one visit, using a prefabricated post. These posts come in several forms: parallel-wall smooth cylindrical shape, parallel-wall screw type, and screw type. The posts are made from stainless steel, titanium, composite, and fiber. Prefabricated posts can be divided into two basic categories: passive and active. A passive post does not impart any stress on the root on insertion, whereas an active post stresses the root on insertion.
The use of a post has been associated with fractures and ultimate failure of the tooth: This occurs in many more teeth with posts than without. With that in mind, it must be considered that the purpose of the post is to retain the core while minimizing the risk for fracture of the tooth. The parallel-walled passively fitting post is believed to minimize the chance of fracture versus a screw-type post that is actively screwed into a tooth and places forces on the remaining tooth structure, increasing the risk of fracture. When selecting a post, one must remember that roots taper as the canal preparation moves apically. Care should be exercised to not overprepare the apical portion and to conserve as much tooth structure as possible.
Once the post type has been selected, the technique involves preparing the root canal space and cementing the post, followed by the core buildup. The depth of the post preparation should be based on the length of the root canal and the amount of root structure in bone. Ideally, the post should be placed to a length that is at least half of the remaining root structure in bone while retaining 3 mm to 5 mm of gutta percha at the apical area. While all canals are not spherical, the post space will be prepared to a round shape without overpreparation of the root, which can lead to root fracture. Consequently, it is important that the depth and width of the canal are prepared to allow the prefabricated post to fit the prepared space as closely as possible. The post is cemented in the post space using an adhesive-type cement.
This process has improved as technology and research have advanced the dental cements available. Once, posts were cemented with zinc phosphate cement; now, an adhesive-type cement is used, which increases the retention of the post and strengthens the entire system. While metal posts can be cemented with various cements, it is advantageous to bond fiber posts within the canal because this increases the system’s strength.
Other improvements in post systems include the material from which the post is made. Traditionally, posts have been fabricated using different metals; however, current technology is allowing the fabrication of posts from resin and fiber materials. These posts allow cements to be cured through the posts themselves, are more esthetic, and can more closely replicate the modulus of the tooth’s elasticity. In addition, some tout the flexibility of the post system.
In any situation, the key to success in a post-and-core restoration revolves around certain essential factors. The post should passively fit in a well-prepared proper-length post preparation that conserves the most tooth structure possible. The post space should be cleaned and dried, and the post properly cemented with an adhesive system. The core should be built up to meet the requirements of the preparation of the tooth being restored. Even with a tooth being restored with a post and core, critical to the success of the full-coverage restoration is ensuring an adequate ferrule exists on the remaining sound tooth structure. While the post and core is important for retention of the full-coverage restoration, ultimately the remaining tooth structure will determine the success of the restoration.
Post and cores have many variables in terms of which systems, materials, and techniques are used. Research supports varying techniques and is somewhat ambiguous in determining what the ideal post and core would entail. This is understandable because, ultimately, the post and core will be determined by each clinical situation that is presented. The dentist can use the information available about the techniques and materials on hand to create the post and core that will best help retain the full-coverage restoration and minimize detrimental forces on the tooth. As materials continue to develop, our ability as dentists to create better post-and-core systems will improve.
A post and core is a dental restoration, which is used to sufficiently restore a tooth morphology followed by future restoration such as a crown, when there is no an adequate part of tooth hard tissue regarding to the required clinical indication of the case, due to loss of tooth structure as a result of decay, fracture or other causes. Post and cores can be referred as one of the foundation restorations.
Deciding Post in the Root or Not – The decision to place a post in the root canal is based depending on the amount of tooth structure remaining above the gum line. If sufficient amount of tooth structure is present above the gum line and a small access cavity is present, then there is no need for placement of post. The tooth is just filled with a filling material and crown is placed over it if it is required.
But if large amount of tooth structure is missing above the gum line, a post has to be placed inside the root canal so that crown can be retained properly over it.
Treatment with a post and core
Post and cores divide into two main groups: prefabricated and cast. Both of these systems employ a post that is placed within the root canal of the tooth being restored. Thus the tooth must first be endodontically treated. After the endodontic procedure has been completed, and the root canal(s) is/are filled with the inert gutta percha root canal filling material, some gutta percha is removed from the canal space, usually by a series of endodontic files that prepares and shapes the root canal. The space that exists coronal to the remaining gutta percha, called the post space, is now available within which to place a post. It is desirable to leave sufficient root filling material in the apical area to maintain an apical seal.
Post space and associated length of post
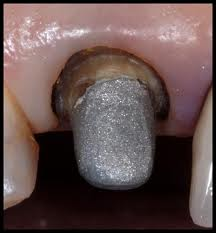
Completed post and core as seen in the mouth
In post and core fabrication, it is desirable that the post descend at least two third of the length of root canal (or not less than the height of the crown) in order to provide sufficient retention.
Basically, it is important to leave at least 5 mm of gutta percha at the apex of the root canal, even at the expense of a longer post, because it is within the apical 5 mm of the root canal that the apical delta anastomose with the exterior surface of the root. Should these lateral canals not be blocked with the gutta percha and the cement used to place the gutta percha, the chances of microleakage and percolation of microbes are greatly increased, thereby increasing the likelihood of an endodontic failure.
It is not necessarily the length of the post within the root canal that provides for retention of the core, and thus the eventual crown, but rather the length of post that will exist within root structure that exists within surrounding bone. If the post is 16 mm long, but only extends 4 mm into root structure that is surrounded by solid bone, the restoration will have a poor prognosis. This consideration of crown-to-root ratio is essential when evaluating the tooth for a crown lengthening procedure.
In the picture at right, the two teeth on the extreme left and right are the ones under discussion. The two teeth in the middle have been endodontically treated, but do not have post and cores.
Prefabricated post and cores
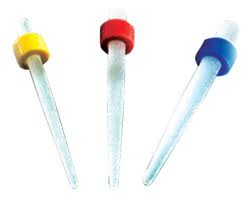
Prefabricated fiber post
Prefabricated post and cores take less time to place, as they do not involve any lab work and can be inserted immediately upon the decision to utilize them, once the endodontic therapy has been completed and the post space cleared of gutta percha. After the prefabricated post is properly cemented into the post space, a core material, such as Dental composite, can be packed around the cemented post. After the material has been cured or has had a chance to set and properly formed into a crown preparation, an impression can be taken for the fabrication of a prosthetic crown.
Metal prefabricated post systems are being superseded by fibre-reinforced composite resin post systems which offer improved resistance to untreatable fracture of tooth substrate such as vertical root fracture.
Cast post and cores
In cases where the post space is not a good match for a prefabricated post, a cast post and core can be custom fabricated for the tooth. A resin pattern is produced by placing a preformed plastic “burnout” post into the post space and a resin material, such as Duralay resin, is used to build up the tooth to the proper dimensions. When this is completed, the pattern resin/plastic post is removed from the tooth structure and attached to a sprue former, much in the same way as a is done with the wax pattern of a crown, and a single-unit cast post and core can thus be fabricated out of gold, titanium or another metal using the lost-wax technique. Where a metal post could be difficult to conceal a custom post made of Zirconia Oxide can be made, it’s tooth colour leaves less of a shadow under the final restoration. Alternatively an impression can be taken of the post space and dental arch using a plastic post and a polyvinylsiloxane impression material, and this used to construct a suitable post in the dental laboratory.
A severe fracture or severe tooth decay may cause a tooth break. If this happens many times, too much of tooth mass will be lost and the teeth will not be able to support a dental crown. In early periods, dentists would extract such teeth. But, now this is not the only option. Today, dentists resort to the post and core method to save the tooth and also allow it to support a cosmetic dental crown
What is post and core?
A post and core, a thin metal rod, is a component of an extensive tooth repair. It is cemented into the root of a tooth. A post and core consists of a post to fit into the root canal and a core portion which projects above the gum. A new crown can be cemented into the position over the core portion.
What is the need for a post and core?
Teeth, which are treated for root canal problems, may often be badly broken down. They should be built up before a replacement crown has been fitted over them. Post and core fabrication is a method of teeth repair that is chosen for the build-up process.
How to place post and core?
The process of placing post and core for teeth repair include several steps.
Root canal: The first step to place a post and core is performing a root canal on your tooth. It helps to remove all infection below the gum line as well as extracts the dead teeth.
Place the post: The dentist shapes the tooth interior using a special hand tool called a dental file. Then, he fits the custom-made dental post at the center of this hollowed-out space, positions and cements it in place.
Apply the core: After placing the dental post, the core material that is made from cosmetic dental bonding material is applied. This material is semi-liquid iature and can quickly adapt to the contours of your tooth interior while applying.
Shape the core: After the core hardens, the dentist shapes it so that it can be fitted with a dental crown and can support it.
Take impression: The dentist takes impressions of all of your teeth and send it to a lab. These impressions are used to custom-fit a crown to that particular tooth.
Place a temporary crown: A temporary crown is placed on your tooth to protect your dental post and care until the permanent crown is ready. You should visit your dental office after some days to remove the temporary crown and place the permanent one.
The main benefit with a post and core procedure is that it allows you to protect a tooth that otherwise would be damaged or lost. Other advantages of this teeth repair options include providing a much better anchor for supporting a dental crown, added support to overall tooth structure and better retention of the dental crown itself after it has been fitted.
Dental non-precious full metal post core(Orthodontic/Prosthesis)Excellent quality,beautiful morphology,economy price
Dental non-precious full metal post cores(Orthodontic/Prosthesis)
1.Made of full metal-cobalt & chromium
2Good solidity and durability.
3.Excellent quality,beautiful morphology,economy price
4.FDA registratioumber:3007420730.
Dental Non-precious post core
1.Use non-precious alloy contains co-cr
2.Good retention.
3.Superior quality.
4.Acceptable price
5.Ontime delivery
6.Thorough aftersale services
For more than 250 years, clinicians have written about the placement of posts in the roots of teeth to retain restorations.1 As early as 1728, Pierre Fauchard described the use of “tenons,” which were metal posts screwed into the roots of teeth to retain bridges.1 In the mid-1800s, wood replaced metal as the post material, and the “pivot crown,” a wooden post fitted to an artificial crown and to the canal of the root, was popular among dentists.1 Often, these wooden posts would absorb fluids and expand, frequently causing root fractures.2 In the late 19th century, the “Richmond crown,” a single-piece post-retained crown with a porcelain facing, was engineered to function as a bridge retainer.2 During the 1930s, the custom cast post-and-core was developed to replace the one-piece post crowns. This procedure required casting a post-and-core as a separate component from the crown.2 This 2-step technique improved marginal adaptation and allowed for a variation in the path of insertion of the crown.1
CAUSES OF POST-RETAINED CROWN FAILURE
The failure of post-retained crowns has been documented in several clinical studies (Figure 1).3 Many of these studies indicate that the failure rate of restorations on pulpless teeth with post-and-cores is higher than that for restorations of vital teeth.3
|
|
|
|
Figure 1a and 1b. Restorative failure of an all-ceramic crown on the maxillary right central occurring after endodontic treatment. A minimum of a 1 mm collar on sound tooth structure is required for a ferrule design. |
|
|
|
|
Figures 2a and 2b. After determining the desired post channel length (one half to two thirds length of canal), the gutta-percha was removed with a series of pre-shaping instruments (Gates Glidden [SybronEndo]) (Rebilda post reamer [VOCO]). |
Several main causes of failure of post-retained restorations have been identified, including: recurrent caries, endodontic failure, periodontal disease, post dislodgement, cement failure, post-core separation, crown-core separation, loss of post retention, core fracture, loss of crown retention, post distortion, post fracture, tooth fracture, and root fracture.4-6 Also, corrosion of metallic posts has been proposed as a cause of root fracture.7
A COMPARISON OF CURRENT POST SYSTEMS
|
|
|
|
Figure 3. The channel preparation for a prefabricated fiber-reinforced post was performed using a color-coded drill (Rebilda post drill [VOCO]), establishing the desired intraradicular length and size for the selected post. |
Figure 4. The pre-selected fiber-reinforced composite post (Rebilda post [VOCO]) was placed into the channel space. The coronal height was measured and marked with a diamond disc to the desired length. The post is cleaned with alcohol, silanated (Ceramic Primer [VOCO]) for 60 seconds, and then air-dried. |
Today, the clinician can choose from a variety of post-and-core systems for different endodontic and restorative requirements. These systems and methods are well-documented in the literature.8-10 However, no single system provides the perfect restorative solution for every clinical circumstance, and each situation requires an individual evaluation.
Custom Cast Posts
The traditional custom-cast dowel core provides a better geometric adaptation to excessively flared or elliptical canals, and almost always requires minimum tooth structure removal.1 Custom cast post-and-cores adapt well to canals with extremely tapered canals or those with a noncircular cross section and/or irregular shape, and roots with minimal remaining coronal tooth structure.9 Patterns for custom cast posts can be formed either directly in the mouth or indirectly in the laboratory. Regardless, this method requires 2 appointment visits and a laboratory fee.
|
|
|
|
Figures 5a and 5b. A dual-curing, self-etch adhesive (Futurabond DC [VOCO]) was applied with an applicator (Endo Tim [VOCO]) to the base of the post space and air-dried. Any excess adhesive was absorbed with an endodontic paper point using a rapid |
|
|
|
Figure 6. A dual-cure, resin cement (Bifix QM [VOCO]) was injected into the post channel using an angled tip (Intraoral Tip Type 1 [VOCO]). It is important to remove the tip slowly while injecting, to prevent incorporation of air bubbles. |
|
|
|
|
Figures 7a and 7b. The fiber post was immediately inserted into the post hole to the base of the prepared channel and light-cured from different positions for 2 minutes (7a). After polymerization, the fiber post was cut with a diamond bur to the predetermined length. Never use a serrated instrument or shears because this can damage the integrity of the post (7b). |
Also, because it is cast in an alloy with a modulus of elasticity that can be as high as 10 times greater thaatural dentin,11 this possible incompatibility can create stress concentrations in the less rigid root, resulting in post separation and failure. Additionally, the transmission of occlusal forces through the metal core can focus stresses at specific regions of the root, causing root fracture.11 Furthermore, upon aesthetic consideration, the cast metallic post can result in discoloration and shadowing of the gingiva and the cervical aspect of the tooth.
PREFABRICATED POST-AND-CORE SYSTEMS
An alternative consideration is the prefabricated post-and-core system. Prefabricated post-and-core systems are classified according to their geometry (shape and configuration) and method of retention. The methods of retention are designated as active or passive. Active posts engage the dentinal walls of the preparation upon insertion, whereas passive posts do not engage the dentin, relying instead on cement for retention.1 The basic post shapes and surface configuration are tapered, serrated; tapered, smooth-sided; tapered, threaded; parallel, serrated; parallel, smooth-sided; and parallel, threaded. While active or threaded posts are more retentive than the passive posts, the active posts create high stress during placement and increase the susceptibility of root fracture when occlusal forces are applied. Parallel-sided serrated posts are the most retentive of the passive prefabricated posts, and the tapered smooth-sided posts are the least retentive of all designs.2
Prefabricated Metal Posts
Traditional prefabricated metal posts are made of platinum-gold-palladium, brass, nickel-chromium (stainless steel), pure titanium, titanium alloys, and chromium alloys.2,4 Although stainless steel is stronger, the potential for adverse tissue responses to the nickel has motivated the use of titanium alloy.12 Also, contributing factors to root fracture such as excessive stiffness (modulus of elasticity)13 and post corrosion2 from many of these metal posts have stimulated concerns about their use.
Prefabricated Nonmetallic Posts
|
|
|
|
|
|
|
Figures 8a to 8d. (8a) A dual-curing self-etch adhesive (Futurabond DC) was applied to the remaining dentin surface and light-cured for 10 seconds. (8b) A dual-cure, radiopaque flowable core-build-up composite material (Rebilda) was injected over the coronal aspect of the post, (8c), sculpted with a long bladed interproximal instrument, (8d) and smoothed with a No. 2 sable brush to an ideal coronal preparation geometric shape and dimension and light-cured for 40 seconds. |
The nonmetallic prefabricated posts have been developed as alternatives, including ceramic (white zirconium oxide) and fiber-reinforced resin posts. Zirconium oxide posts have a high flexural strength, are biocompatible, and are corrosion resistant. However, this material is difficult to cut intraorally with a diamond, and to remove from the canal for retreatment.4 The fiber-reinforced composite resin post-and-core system offers several advantages: a one appointment technique, no laboratory fees, no corrosion, negligible root fracture, no designated orifice size, increased retention resulting from surface irregularities, conserved tooth structure, and no negative effect on aesthetics.
THE FERRULE EFFECT
|
|
|
|
Figure 9. Completed fiber-reinforced composite post-and-core. The placement of a 1.0 mm circumferential ferrule on sound tooth structure ensures the mechanical retention and resistance. |
Figure 10. An optimal adhesive integration between the components of the post-retained system which provides a structural integrity for intraradicular rehabilitation. |
The successful rehabilitation of any endodontically treated tooth using the post-retained system requires the consideration of one specific structural design characteristic: the ferrule effect. The stability of the crown is influenced by the preparation design for endodontically treated teeth. Preserving tooth structure during preparation is paramount in preventing stress concentrations at the cementoenamel junction of the endodontically restored tooth and provides resistance to tooth fracture. The completed crown preparation should have a ferrule design that encapsulates the endodontically re-stored tooth complex. This collar effect provides an antirotational feature for the stability of the crown. Clinical studies have demonstrated and confirmed the importance of this coronal tooth “collar” on the mechanical resistance and retention form of the endodontically restored tooth complex.14 The general guideline is a 1.0 to 2.0 mm preparation on sound tooth structure. Procedures that provide a shoulder on tooth structure, and an axial preparation on the core buildup, will have an insufficient ferrule design. In cases where there is insufficient sound tooth structure for a ferrule design, it is necessary to obtain this dimension through p Pivot crowns.
Stump crown inserts
The main difference between these structures is the fact that this design is unique in prosthodontics, which is its main part in the root canal. This part of the structure and is called the post.
At first let us analyze the transitional form between an insert and pivot crown – the so-called stump insert, which, after fixation is covered with various crowns. The system, consisting of two independent parts (cast post insert and a crown covering it ), has several advantages over all types of pivot crown teeth and a simple insert, because it is always possible to replace covering structure without violation of fixation integrity of cast post insert.
Indications for usage of cast post inserts:
1) significant defects in dental crowns as a result of tooth decay or injury,
2) pathological abrasion of tooth hard tissue,
3) anomalies of the anterior teeth in adults;
Contraindications for usage of cast post inserts:
1) Tooth mobilityIII,
2) insufficient length of the tooth root to form a complete post insert ,
3) teeth have previously undergone resection of the tips of roots,
4) teeth with curved roots and impassable canals.
5) .
Clinical-laboratory stages of making stump crown insert by indirect method
|
CLINICAL |
LABORATORY |
|
1. Preparation of tooth canal and cavity. Obtaining bilayer impression (it is obtained by special way with reflection of tooth cavity and canal) from working jaw, additional impression иocclusive impression. Occlusiveimpressionisbetterobtainedwithsilicon. |
1) Casting dismountable model. 2) Modelinginsertfromwax. 3) Obtaining insert from wax. 4) Replacementwaxtometal. 5) Grinding insert. |
|
II. Adjustment stump crown insert in mouth, fixing on cement. |
|
During preparing the tooth root canal of the doctor takes into account the thickness of its walls. After the expansion of the channel in the mouth the doctor creates a so-called elliptical cavity depreciation in the vestibular-oral direction depth of 2.5-3.5 mm and a width of 1.5-2.5 mm,which can improve the fixation of cast post insert and excludes its turning in the canal during chewing movements.
Canal expands to the diameter of 1-3 mm depending on the level of teeth and location.
After the preparation of dental hard tissues a bilayer silicone impression is obtained. When obtaining the impression with a special post or canal-filler the doctor “drives in” corrective mass into the tooth root canal and thus gets the impression of the tooth root.
Combined dismountable model is prepared in the usual way. The surface of the tooth cavity and channel is smeared with compensation varnish.When the model is ready cast post insert modeling is started. For this purpose special wax is used. Typically, waxes for stump inserts are in the form of elongated flat sticks. A stick of wax is warmed, pulling it until its thickness is thinner the diameter of the entrance to the channel. Stick is entered to the model channel with slight pressure. Excess wax is cut at the level of the occlusal surface. Then it is proceed to the modeling insert overroot part. It is shaped into a truncated cone. Interocclusal distance that is formed depending on the structure, which will cover the stump insert.
After completing modeling in the thickness of the sump part of the wax composition along the tooth axis at 1-2 mm heated metal post length of about 1 cm (usually this is an orthodontic wire)is entered, which after the fixatioeeds to be cooled with a stream of cold water. Wax insert composition is removed with tongs by the back part of a metal post with efforts along the axis of the tooth.
Modeling cast post inserts at abnormalities of the teeth is different. With a view to aesthetic layout nonremovable prosthesis in the dental arch the stump part of the post insert is modeled, slightly modifying the topography of the stump. In this case one must consider the action of functional forces and know, that the inclination of the stump part to the axis of the tooth must not exceed 15 °.
With proper preparation of the abutment tooth and the observance of the laboratory technology of casting metal insert should be freely entered into the root canal and fit snugly to the hard tissues of the abutment tooth.
After adjustment it is necessary to grind roughness on insert stump off. To conduct grinding or other interventions on insert post part is unacceptable.
Pivot crown tooth by Richmond.
Indications are the same as for the stump insert. The peculiarity of indications is the 0.5-1 mm smaller height of the tooth stump over the gum.
Drawbacks of pivot crown tooth by Richmond:
1. Lack of cosmetical view. In the cervical region rim of the metal ring is always visible .
2. A lot of effort (you need three fittings), the complexity of the structure fittting on the model.
3. The presence of solder can lead to galvanoses appearance.
Clinical-laboratory stages of making pivot crown by Richmond.
|
CLINICAL |
LABORATORY |
|
1. Canal preparation and root stump. Root on vestibule of mouth side is grinded off lower than gum edge, and on oral cavity side it is kept of of 2,5—2 mm tooth height. Obtaining bilayer impression (is taken by special way with reflection of tooth cavity and canal) from working jaw. |
1. Casting model. 2. Making stamped cap on a stump.
|
|
2. Adjustment a cap on a stump. In the top of a cap a hole is made. Post is inserted through the crown into the canal |
3. Making a model with a cap and a post. 4. Soldering a post to a cap. |
|
3. Fitting structure in oral cavity. Choosing plastic coating colour. Obtaining impressions from upper and lower jaws. |
6. Casting model моделей 7. Modeling wax coating . 8. Replacement wax by plastic. |
|
4.Fixing ready pivot tooth on cement. |
|
Root cap can be made by two methods.
1. 1. The root is spanned with a wire, and its circumference is determined ; the wire is cut and its length respectively ring is manufactured with thickness 0,25-0,28 mm gold 916-th sample. Ring is fitted tightly to the root of 0.5-0.75 mm at the gingival edge. To the surface of the ring gold plate in the form of a tire is soldered,a hole is drilled in the center of the plate, respectively to the mouth of a channel through which a post from an alloy of gold and platinum is introduced into the channel . The post must be kept firmly in the plate of the ring; the post surplus that goes above the surface, it pressed across for better connection with the replica.
2. 2. According to the model stamped cap from steel sleeve is made, using the same materials as for stamping crowns. In the center of the cap hole is drilled, a post is inserted through it and soldered to the surface of the cap. Subsequent phases of work are performed, as in the first method.In order to facilitate the removal of the post with a cap or overroot protection on the outer surface of the model a hole is cut through which the post is pushed out.
Pivot crown tooth by Shargorodskiy.
Indications are the same as for stump insert
Structure advantages over given:
1. Significantly fewer clinical stage
2. More reliable
3. High cosmetics
Disadvantages of pivot crown tooth by Shargorodskiy:
1. Laboratory technique of pivot crown tooth making is not accurate enough (the ring is made according to measurements not impressions);
2. The presence of solder can lead to galvanoses appearance.
Clinical-laboratory stages of making pivot crown by Shargorodskiy.
|
CLINICAL |
LABORATORY |
|
1 Canal preparation and root stump. Tooth root preparation is done. Root circumference is defined with thin steel wire. |
1. Steel sleeve of the same circumference as arched wire is streched. Afterwards sleeve bottom is grinded off with carborundum stone.. |
|
2. Obtained steel ring is fitted to the root. A steel post is entered into root canal .Impressions are obtained. Plastic coating colour is chosen.. |
3. Casting models. 4. Fixingmodelinoccludor. 5. Plaster is removed carefully from the root, the post is taken away. 6. Then the post is placed and the whole root surface with the ring is covered with modeling wax. The tooth is modeled to wax on inner side exceed the ring slightly, and on the outer side a bed is made for a porcelain tooth or plastic. 7. Wax model with the post is formed in packing mass and cast from steel. 8. Cast is placed and soldered with the ring. 9. Plastic cvoating is made. Grinded, polished. |
|
3. Fixation of pivot crown tooth on cement. |
|
Pivot crown tooth by Akhmedov.
Indications are the same as for the stump insert. But for this design a sufficient height the remaining stump (1 / 3 the height of the crown damaged)is required, so this structure is intermediate between the combined crown and a classic pot crown tooth (by Richmond).
Clinical-laboratory stages of making pivot crown by Akhmedov.
|
CLINICAL |
LABORATOREY |
|
1. Canal preparation and root stump. Remained stump must have cone shape. Impression is obtained in plaster. |
1. Makingstampedcrownfor atoothstump. To the effect tooth complete anatomical form is recreated with wax. |
|
2. Crown fitting.. Thorough fixing of a crown on a stump. Standard post adjustment. The crown is filled up with wax and put on the root. On the crown palate side by wax imprint a hole for a post is made. The crown is filled with wax again. The post is inserted through the crown and an impression is obtained. |
2. Making model with a crown and a post. 3. Soldering the post to the crown.
|
|
3. Structure fitting in oral cavity. The crown is filled with wax again. An impression is obtained. Plastic coating colour is chosen. |
4. Vestibular surface of the crown is carved in the form of a window (as in a crown by Belkin), along the cut line retention marks are made. Crown is placed on model. 5. Waxcoatingmodeling. 6. Replacement wax by plastic. Structure polishing |
|
4. Fixation of a pivot crown tooth on cement. |
|
Usually, when you get a toothache, it is because the tooth is badly decayed or very heavily restored (filled). When a toothache is bad enough, the nerve inside it is dead or dying, and in order to relieve the toothache or abscess, it is necessary to either extract the tooth, or to remove the nerve from the tooth. The latter choice saves the tooth, and the procedure is called a root canal. When a root canal has been performed on a tooth, we say that the tooth has been “Endodontically treated”. Endodontically treated teeth have a number of characteristics that makes them different thaormal “vital” teeth (teeth with live nerves inside them).
Endodontically treated teeth tend to be badly damaged above the gum line due to decay and old fillings. They also are more brittle than vital teeth, something like a dead tree branch in comparison to one that is alive. For these reasons, once the root canal has been performed, these teeth need special treatment, or they generally break a few years down the line. This is especially true of back teeth that have broad biting surfaces. They are likely to shear off because of biting forces. For this reason, simple fillings do not usually restore them for very long. These teeth need to have crowns placed in order to protect the investment in the root canal treatment.
But unfortunately, because of the very poor condition these teeth have been left in as a result of the original decay, there is ofteot very much tooth left above the gum line to “hang” the crown on. For this reason, we need to do a special kind of filling on the tooth that will be so firmly embedded in what does remain of the tooth that it will not dislodge later when it is prepared as a core for the crown. (A core is that part of the tooth and the fillings in it that are left over after the tooth has been prepared to receive a crown.)
The first step is to remove some of the gutta percha that was used to seal one or more of the root canals in the tooth. Then, using a series of graduated rasps, the inside of the canals are enlarged and shaped to receive a specially made metal “post” that exactly fits the hole made by the last rasp. These posts are usually pre-manufactured and come in many different shapes. The post is then cemented in the hole so that it is firmly embedded in the root of the tooth, and projects up above the level of the gums in order to help retain a filling (technically known as the core) that will be placed over it.
The posts themselves come in several different materials and various shapes. The one presented here is made of titanium and is looks a bit like a wood screw, but don’t let the shape fool you. No dentist would ever actually “screw” a post shaped like this into a tooth because it would crack the root. The post is placed passively in the precisely prepared hole, and held in place with one of a number of different types of cement. Other types of posts may be made of stainless steel, carbon fiber, or even ceramic materials. Some taper, like the one pictured above while others have blunt ends and look like long, thin cylinders.
The core is really just a filling that is placed over the tooth stump and the newly placed post. It is now retained on the tooth by whatever undercuts are available on the inside of the remaining tooth stump as well as the post which is firmly cemented in the root. This filling (core) is meant to be prepared for a crown, but it may remain temporarily as a finished restoration.
Finally, the tooth and filling are prepared to receive a crown. This is done by grinding down the filling and what remains of the tooth above gum line to a form similar to the one in the schematic on the right. The “margins” of the crown preparation are usually prepared slightly below the gum line, and on tooth structure, rather than on the core material. This ensures a tight, waterproof seal around the finished crown. The prepared part of the tooth above the gum which includes both tooth structure and core (filling) material is called the preparation.
Once the tooth has been prepared, a rubber impression is taken (shown at the left) and this is sent to the lab. At the lab, the impression is poured with plaster creating a plaster model which is a duplicate of the prepared tooth above the gum line. Using this model the lab fabricates a custom crown which is then sent back to the dentist for cementation on the prepared tooth.
Not every tooth with a root canal needs a post, but every tooth with a root canal needs a core!
Looking at the image above, one can see that without the core (filling) portion of the preparation, there would not be much tooth left above the gum line to retain the crown. Even a tooth that is largely intact after the root canal treatment has a hole leading into the pulp chamber to allow access for the root canal procedure. This needs to be filled before doing the crown preparation. Otherwise, the empty space inside the preparation would leave the tooth weak and prone to breaking off after the crown is placed.
A core (without a post) in a tooth with a root canal has an advantage over an ordinary filling in a tooth without a root canal. The root canalled tooth has an empty pulp chamber which also may be filled. This pulp chamber adds substantial retention to the filling. In other words, preparing the repaired tooth for a crown generally leaves a large part of the filling intact inside the tooth making it difficult to dislodge. Teeth that are mostly intact may often be filled without placing a post inside the core for additional retention without much fear that the core will break out later.
I make the decision of whether or not to place a post in the tooth based on the amount of tooth structure that is left above the gum line. If the tooth above the gums is substantially intact with only a small access hole in the top, then a core (filling) without a post is generally sufficient. If there is a lot of tooth structure missing due to decay or for any other reason, then I usually place a post in the tooth to make sure that the core will be properly retained after the crown prep has been cut.

